IBM VXA-2 User Guide - Page 13
Installation, Installation requirements, Preparing for installation - tape
 |
View all IBM VXA-2 manuals
Add to My Manuals
Save this manual to your list of manuals |
Page 13 highlights
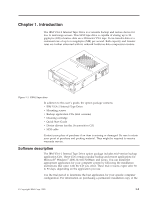
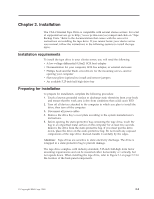
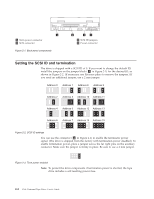
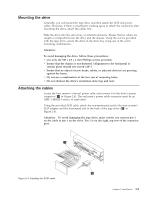
Chapter 2. Installation The VXA-2 Internal Tape Drive is compatible with several xSeries servers. For a list of supported servers go to http://www.pc.ibm.com/us/compat and click on ″Tape Backup Units.″ Refer to the documentation that comes with the server for instructions on installing the tape drive. If you cannot locate your xSeries server user manual, follow the instructions in the following sections to install the tape drive. Installation requirements To install the tape drive in your xSeries server, you will need the following: v A low voltage differential (Ultra2) SCSI host adapter v Documentation for your computer, SCSI bus adapter, or external enclosure v Phillips head and flat blade screwdrivers for the mounting screws, and for opening your computer v Flat-nose pliers (optional) to install and remove jumpers v An available 5.25-inch half high drive bay Preparing for installation To prepare for installation, complete the following procedure: 1. Touch a known grounded surface to discharge static electricity from your body and ensure that the work area is free from conditions that could cause ESD. 2. Turn off all devices attached to the computer in which you plan to install the drive, then turn off the computer. 3. Disconnect all power cables. 4. Remove the drive bay's cover plate according to the system manufacturer's instructions. 5. Before opening the static-protective bag containing the tape drive, touch the bag to an unpainted metal surface on the computer for at least two seconds. Remove the drive from the static-protective bag. If you must put the drive down, place the drive on the static-protective bag. Do not touch any exposed components of the tape drive. Instead, handle it carefully by the edges. Attention: Tape drives are sensitive to static electricity discharge. The drive is wrapped in a static-protective bag to prevent damage. The tape drive complies with industry-standard, 5.25-inch half-high form factor mounting requirements and can be mounted either horizontally or vertically, but not upside down. When installing the tape drive, refer to Figure 2-1 on page 2-2 for the location of the back-panel components. © Copyright IBM Corp. 2003 2-1
-
 1
1 -
2
-
3
-
4
-
5
-
6
-
7
-
 8
8 -
 9
9 -
 10
10 -
 11
11 -
 12
12 -
 13
13 -
 14
14 -
 15
15 -
 16
16 -
 17
17 -
 18
18 -
19
-
20
-
21
-
22
-
23
-
24
-
25
-
26
-
27
-
28
-
29
-
30
-
31
-
32
-
33
-
34
-
35
-
36
-
37
-
38
-
39
-
40
-
41
-
42
-
43
-
44
-
45
-
46
-
47
-
48
-
49
-
50
-
51
-
52
-
53
-
54
-
55
-
56
 |
 |
