IBM x3655 User Guide - Page 59
bottom-left
 |
UPC - 883436014533
View all IBM x3655 manuals
Add to My Manuals
Save this manual to your list of manuals |
Page 59 highlights
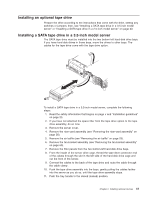
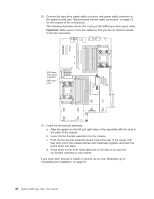
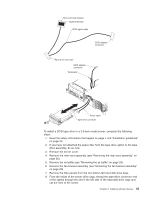
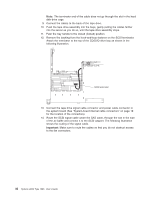
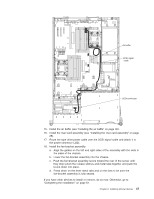
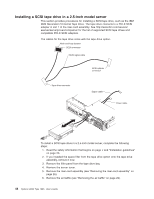
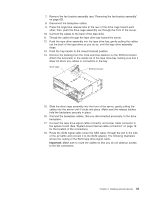
Hook-and-loop fastener SCSI terminator SCSI signal cable SCSI adapter connector Tape drive connector SCSI adapter connector Terminator Power cable Tape drive connector To install a SCSI tape drive in a 3.5-inch model server, complete the following steps: 1. Read the safety information that begins on page v and "Installation guidelines" on page 23. 2. If you have not attached the space filler from the tape drive option to the tape drive assembly, do so now. 3. Remove the server cover. 4. Remove the riser-card assembly (see "Removing the riser-card assembly" on page 26). 5. Remove the air baffle (see "Removing the air baffle" on page 29). 6. Remove the fan-bracket assembly (see "Removing the fan-bracket assembly" on page 60). 7. Remove the filler panels from the two bottom-left hard disk drive bays. 8. From the inside of the server drive cage, thread the tape-drive connector end of the cables through the slot in the left side of the hard disk drive cage and out the front of the server. Chapter 2. Installing optional devices 45
-
 1
1 -
2
-
3
-
4
-
5
-
6
-
7
-
8
-
9
-
10
-
11
-
12
-
13
-
14
-
15
-
16
-
17
-
18
-
19
-
20
-
21
-
22
-
23
-
24
-
25
-
26
-
27
-
28
-
29
-
30
-
31
-
32
-
33
-
34
-
35
-
36
-
37
-
38
-
39
-
40
-
41
-
42
-
43
-
44
-
45
-
46
-
47
-
48
-
49
-
50
-
51
-
52
-
53
-
 54
54 -
 55
55 -
 56
56 -
 57
57 -
 58
58 -
 59
59 -
 60
60 -
 61
61 -
 62
62 -
 63
63 -
 64
64 -
65
-
66
-
67
-
68
-
69
-
70
-
71
-
72
-
73
-
74
-
75
-
76
-
77
-
78
-
79
-
80
-
81
-
82
-
83
-
84
-
85
-
86
-
87
-
88
-
89
-
90
-
91
-
92
-
93
-
94
-
95
-
96
-
97
-
98
-
99
-
100
-
101
-
102
-
103
-
104
-
105
-
106
-
107
-
108
-
109
-
110
-
111
-
112
-
113
-
114
-
115
-
116
-
117
-
118
 |
 |
