IC Realtime AVS-Z4212S Product Manual - Page 22
Preset, Preset setting
 |
View all IC Realtime AVS-Z4212S manuals
Add to My Manuals
Save this manual to your list of manuals |
Page 22 highlights
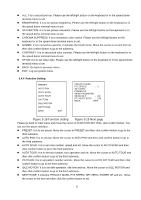
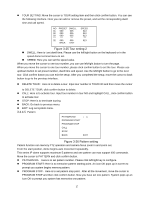
PRIVACY MASK: Here you can set the privacy mask number and etc. It includes the third menu. Please move the cursor to the current item and then click the confirm button to go to the next interface. PTZ SPEED: It is to set PTZ speed. Please use the left/right button to set. SET ZERO: Please move the PTZ to the horizontal coordinates, click OK button to confirm. POWER UP: It is to set the PTZ action when the speed dome boots up. Click the confirm button to go to the next interface to set. MENU PASSWORD: It is to set menu password. Move the cursor to MENU PASSWORD and then click confirm button to go to the next submenu to set. MENU IDLE: If current setup is ON, once you open the menu and leave it idle for specified period, the menu may automatically disappear. If current setup is OFF, the menu is always there and will not disappear. Please use the left/right button to set. PTZ AUTO STOP: The speed dome will stop all the PTZ operations when there is no command for the specified time. It includes various setups. Please use the left/right button to set. BACK: Go back to previous menu. EXIT: Log out system menu. 3.4.4.1 Preset PRESET NO :1 TITLE :PRESET1 SETTING CALL BACK EXIT Figure 3-20 Preset setting Move the cursor to PRESET button and then click confirm button to go to set interface. PRESET NO: Please use left/right key to modify preset number. The different protocols support different preset values. TITLE:Title text is the label used for you to identify the camera. System will automatically name a title for the camera. SETTING: Please input preset number first and then select the monitor zone. Please move the cursor to setting and click confirm button. The system will pop up a message: PRESET: ***. Here *** means preset number. And the SETTING column pops up an OK. Now you successfully added a preset. Please note, you need to enable display preset title function first (Main menu->display setting->preset title).Repeat the above procedures to set more presets. Once you want to modify a preset, you can input the preset number you want to modify and then follow the above steps to set the preset. You can successfully modify a preset content. CALL: Here is to call preset. Move the cursor to PRESET NO and then input corresponding preset value. Then move the cursor to CALL and then click confirm button to go to a preset. BACK: Go back to previous menu. EXIT: Log out system menu. For PELCO protocol user, please refer to the following special functions: Call preset: Call preset 28 or preset 95 to go to dome menu. Call preset 29 or preset 99 to go to scan. Call preset 24 or preset 81 to go to pattern. Call preset 25 or preset 82 to go to tour. Call preset 30 or preset 96 to stop scan or pattern. Call preset 31 or preset 83 to begin rotation. Call preset 33 to enable PTZ 180 degrees rotation. Call preset 34 to set dome position as 0. 15
-
 1
1 -
2
-
3
-
4
-
5
-
6
-
7
-
8
-
9
-
10
-
11
-
12
-
13
-
14
-
15
-
16
-
 17
17 -
 18
18 -
 19
19 -
 20
20 -
 21
21 -
 22
22 -
 23
23 -
 24
24 -
 25
25 -
 26
26 -
 27
27 -
28
-
29
-
30
-
31
-
32
-
33
-
34
-
35
-
36
-
37
 |
 |
