IC Realtime EL-700 Product Manual - Page 6
VDC/24VAC
 |
View all IC Realtime EL-700 manuals
Add to My Manuals
Save this manual to your list of manuals |
Page 6 highlights
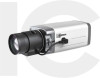
7. Installation 7-3. When using a C-mount Lens • Please assemble C-Mount adaptor. • C-Mount adaptor is included in the package. • Fix the lens by turning it clockwise. C-Mount ADAPTOR 7. Installation 7-5. Video Monitor Connect Video cable with BNC-male connector to the monitor. C-Mount ADAPTOR Protection cover 7-4. When using a CS-mount Lens • Take off the Protection cover. • Take off the C-MOUNT adaptor. • Assemble the CS-MOUNT lens by turning it clockwise. - When used with an Auto Iris lens, please insert the iris jack into the Iris socket which is located on the right side of the camera. - Please set the lens selection switch, located on the back of the camera to DC or VIDEO depending on the type of the auto iris lens selected. GS-Mount Lens mr Caution C-Mount Lens : Less than 11mm CS-Mount Lens : Less than tiimm • Use the lens as shown in the picture here. • When the lens is out of the spec, it could damage the camera inside or may not be correctly fitted with the camera. • Use the lens less than 450g. Heavier lens can damage the camera. Camera Monitor Impedance alliance in the system connection. Make sure to connect the cable with the power off. Please locate the impedance switch of each equipment as instructed. Locate the switch to Hi-z position for the interim equipments. Locate the switch to 75 for the last equipment. 7-6. Power Please refer to the voltage description on the rear panel to choose the right power source. 1` 12VDC camera Please make sure to use a UL/CE approved and 12VDC/500mA regulated power supply. 12VDC/24VAC Dual power camera You can use either 12VDC Power or 24VAC Power source with non-polarity connection. L IIVOC 10VAC
-
 1
1 -
 2
2 -
 3
3 -
 4
4 -
 5
5 -
 6
6 -
 7
7 -
 8
8 -
 9
9 -
 10
10 -
 11
11 -
 12
12 -
13
-
14
-
15
-
16
 |
 |
