Icom IC-M73 Instruction Manual - Page 44
Optional Speaker-microphone
 |
View all Icom IC-M73 manuals
Add to My Manuals
Save this manual to your list of manuals |
Page 44 highlights
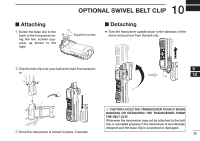
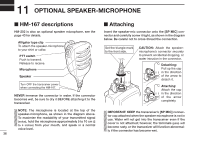
11 OPTIONAL SPEAKER-MICROPHONE ■ HM-167 descriptions HM-202 is also an optional speaker microphone. see the page 43 for details. Alligator type clip To attach the speaker-microphone to your shirt or collar. PTT switch Push to transmit. Release to receive. Microphone Speaker Turn OFF the transceiver power when connecting the HM-167. NEVER immerse the connector in water. If the connector becomes wet, be sure to dry it BEFORE attaching it to the transceiver. NOTE: The microphone is located at the top of the speaker-microphone, as shown in the diagram above. To maximize the readability of your transmitted signal (voice), hold the microphone approximately 5 to 10 cm (2 to 4 inches) from your mouth, and speak in a normal voice level. 36 ■ Attaching Insert the speaker-mic connector onto the [SP MIC] connector and carefully screw it tight, as shown in the diagram below. Be careful not to cross-thread the connection. Set the triangle mark to the front side. CAUTION: Attach the speakermicrophone's connector securely to prevent accidental dropping, or water intrusion in the connector. Detaching: Pull up the cap in the direction of the arrow to detach it. Attaching: Attach the cap in the direction of the arrow completely. IMPORTANT: KEEP the transceiver's [SP MIC] connector cap attached when the speaker-microphone is not in use. Water will not get into the transceiver even if the cover is not attached; however, the terminals (pins) will become rusty, or the transceiver will function abnormally if the connector has become wet.
-
 1
1 -
2
-
3
-
4
-
5
-
6
-
7
-
8
-
9
-
10
-
11
-
12
-
13
-
14
-
15
-
16
-
17
-
18
-
19
-
20
-
21
-
22
-
23
-
24
-
25
-
26
-
27
-
28
-
29
-
30
-
31
-
32
-
33
-
34
-
35
-
36
-
37
-
38
-
 39
39 -
 40
40 -
 41
41 -
 42
42 -
 43
43 -
 44
44 -
 45
45 -
 46
46 -
 47
47 -
 48
48 -
 49
49 -
50
-
51
-
52
-
53
-
54
-
55
-
56
 |
 |
