Image Fitness 3.0 Bench English Manual - Page 10
Adjusting, Image
 |
View all Image Fitness 3.0 Bench manuals
Add to My Manuals
Save this manual to your list of manuals |
Page 10 highlights
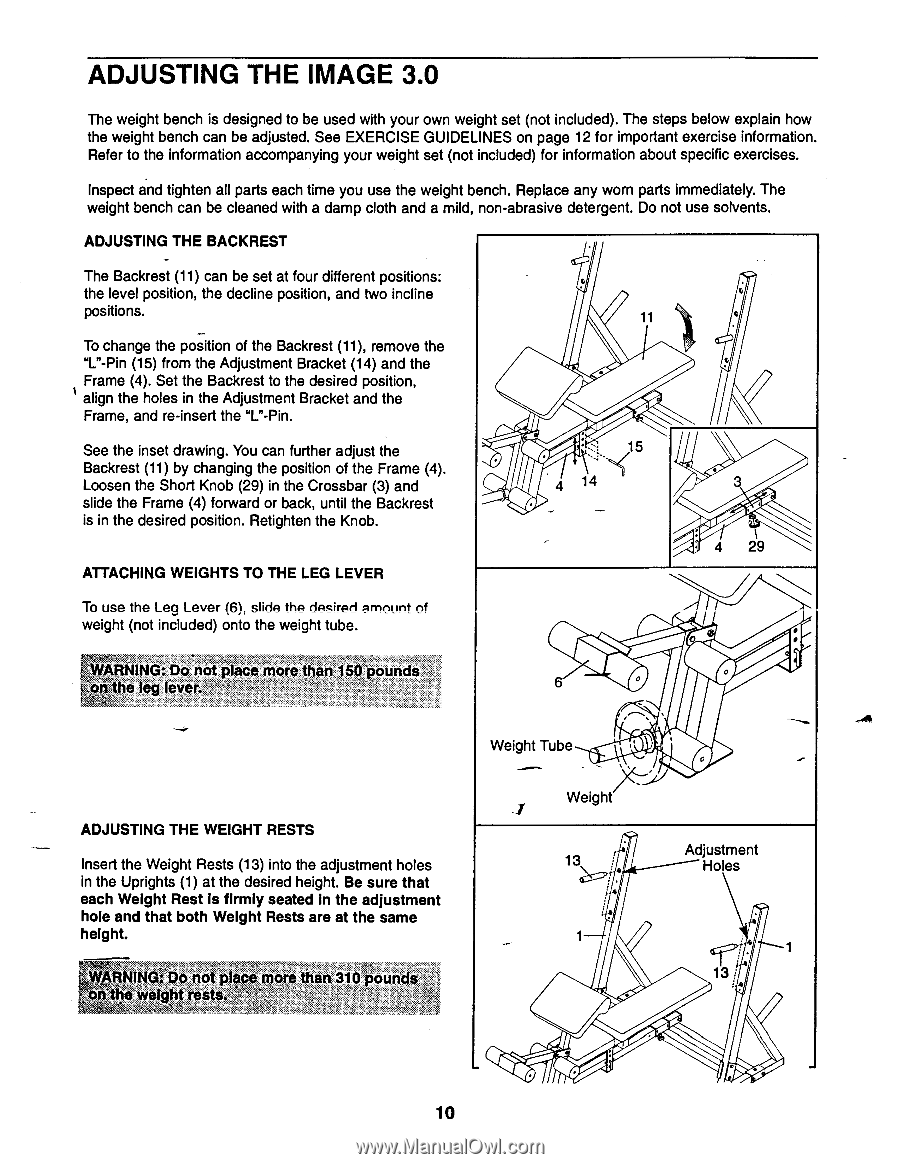
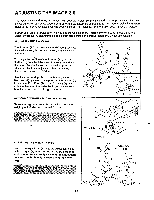
ADJUSTING THE IMAGE 3.0 The weight bench is designed to be used with your own weight set (not included). The steps below explain how the weight bench can be adjusted. See EXERCISE GUIDELINES on page 12 for important exercise information. Refer to the information accompanying your weight set (not included) for information about specific exercises. Inspect and tighten all parts each time you use the weight bench. Replace any worn parts immediately. The weight bench can be cleaned with a damp cloth and a mild, non-abrasive detergent. Do not use solvents. ADJUSTING THE BACKREST The Backrest (11) can be set at four different positions: the level position, the decline position, and two incline positions. To change the position of the Backrest (11), remove the "L"-Pin (15) from the Adjustment Bracket (14) and the Frame (4). Set the Backrest to the desired position, align the holes in the Adjustment Bracket and the Frame, and re-insert the "L"-Pin. See the inset drawing. You can further adjust the Backrest (11) by changing the position of the Frame (4). Loosen the Short Knob (29) in the Crossbar (3) and slide the Frame (4) forward or back, until the Backrest is in the desired position. Retighten the Knob. ATTACHING WEIGHTS TO THE LEG LEVER 11 ..I 15 4 14 4 29 To use the Leg Lever (6), slide the desired amount of weight (not included) onto the weight tube. WARNING: Do not place more than 150 pounds on the leg lever. O O ADJUSTING THE WEIGHT RESTS Insert the Weight Rests (13) into the adjustment holes in the Uprights (1) at the desired height. Be sure that each Weight Rest is firmly seated in the adjustment hole and that both Weight Rests are at the same height. WARNING;Do not place more than 310 pounds on'the weight Weight Tube Weight 13 • 4 0 Adjustment Holes • 4 13 10
-
 1
1 -
2
-
3
-
4
-
 5
5 -
 6
6 -
 7
7 -
 8
8 -
 9
9 -
 10
10 -
 11
11 -
 12
12 -
 13
13 -
 14
14 -
 15
15 -
16
-
17
-
18
-
19
 |
 |