Image Fitness 3.4c Instruction Manual - Page 6
How To Use A Heart Rate Program
 |
View all Image Fitness 3.4c manuals
Add to My Manuals
Save this manual to your list of manuals |
Page 6 highlights
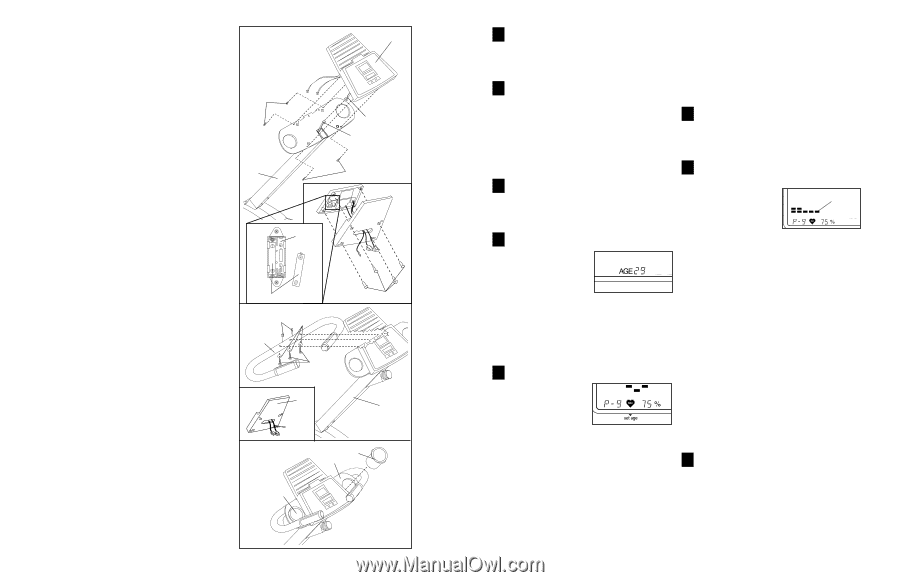
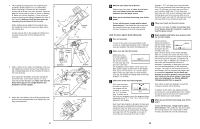
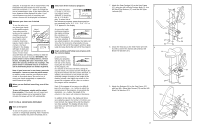
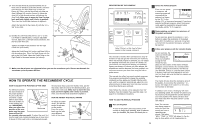
4. The Console (9) requires two "AA" batteries (not included); alkaline batteries are recommended. Refer to drawing A. Remove the four indicated screws and lift off the front of the Console. Press two batteries into the battery holder as shown in drawing B. Make sure that the negative (-) ends of the batteries are touching the springs. Re-attach the front of the Console. Make sure that the three wires are extending from the back of the Console. While another person holds the Console (9) near the Upright (6), connect the Extension Wire (18) to the console wire. Set the Console (9) on the Upright (6). Tighten four Console Screws (20) into the Upright and the Console. 4 20 6 9 Console Wire 18 20 A B Battery Holder 5. While another person holds the Handlebar (16) near the Upright (6), connect the two Pulse Wires (22) to the corresponding wires on the Console (9) (refer to the inset drawing). Next, attach the Handlebar (16) to the Upright (6) with three M8 x 45mm Button Screws (17) and three M8 Curved Washers (28). Make sure that the Pulse Wires (22) are not caught between the Handlebar and the Upright. 6. Attach the Cup Holders (14) by firmly pushing them down into the indicated holes in the Upright (6) until they are seated fully. Batteries 5 22 28 16 17 Screws A 9 6 Console Wires 6 14 6 14 6 4 Measure your heart rate if desired Refer to step 5 on page 10. Note: If your heart rate is not shown, press the resistance - button to reset the pulse sensor. 5 When you are finished exercising, turn off the power To turn off the power, simply wait for about three minutes. If the pedals are not moved and the console buttons are not pressed for three minutes, the power will turn off automatically. Program 7 (P-7) will keep your heart rate near 50% of your maximum heart rate while you exercise; P-8 will keep your heart rate near 60% of your maximum heart rate; P-9 will keep your heart rate near 75% of your maximum heart rate; P10 will keep your heart rate near 85% of your maximum heart rate; and P11 will keep your heart rate near 95% of your maximum heart rate. 4 Place your hands on the pulse sensor See step 5 on page 10. Note: If your heart rate is not shown, press the resistance - button to reset the pulse sensor. HOW TO USE A HEART RATE PROGRAM 1 Turn on the power To turn on the power, press any button on the console or simply begin pedaling. Note: If batteries were just installed, the power will already be on. 2 Enter your age into the console Before you use a heart rate program, you must enter your age into the console. To enter your age, first press the select button repeatedly until the letters "AGE" and a twodigit number appear at the bottom of the display. Next, press the resistance + or - button repeatedly to enter your age. After you have entered your age, the display will change back to the main display in six seconds. 3 Select one of the heart rate programs Each time the power is turned on, the manual program will be selected, as shown by the "P-1" in the display. To select one of the heart rate programs, press the program button repeatedly until a "P-7," "P-8," "P-9," "P10" or "P11" appears in the display. Each heart rate program is designed to keep your heart rate near a preselected percentage of your maximum heart rate while you exercise. (Your maximum heart rate is estimated by subtracting your age from 220. For example, if you are 30 years old, your maximum heart rate is 190.) 5 Begin pedaling and follow your progress with the console display As you exercise, follow your progress with the matrix on the Matrix left side of the display. During the first ten seconds of the pro- gram, the first column of the matrix will flash. After ten seconds, the column will move to the right and the first column will continue to flash. At the end of every ten seconds, all columns will move to the right. In addition, the resistance of the pedals will automatically increase or decrease, if necessary, to keep your heart rate near the preselected level. As the resistance changes, the height of the flashing column will also change. After ten minutes, the program will be completed. Important: For the heart rate program to function properly, you must keep your hands on the pulse sensor. If your heart rate is not displayed, see PULSE SENSOR TROUBLE-SHOOTING on page 12. Note: When a heart rate program is used, the resistance buttons will not function. In addition to the matrix, the display will show your heart rate, your pedaling speed, the number of Calories you have burned, the elapsed time and the distance you have pedaled. 6 When you are finished exercising, turn off the power To turn off the power, simply wait for about three minutes. If the pedals are not moved and the console buttons are not pressed for three minutes, the power will turn off automatically. 11
-
 1
1 -
 2
2 -
 3
3 -
 4
4 -
 5
5 -
 6
6 -
 7
7 -
 8
8
 |
 |