Image Fitness Imevex4715 Instruction Manual - Page 11
How To Connect Your Home Stereo
 |
View all Image Fitness Imevex4715 manuals
Add to My Manuals
Save this manual to your list of manuals |
Page 11 highlights
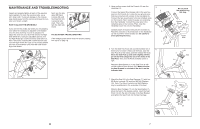
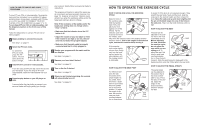
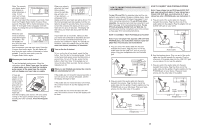
HOW TO CONNECT YOUR HOME STEREO HOW TO CONNECT YOUR COMPUTER Note: If your stereo has an unused LINE OUT jack, see instruction A below. If the LINE OUT jack is being used, see instruction B. Note: If your computer has a 3.5mm LINE OUT jack, see instruction A. If your computer has only a PHONES jack, see instruction B. A. Plug one end of the audio cable into the jack beneath the console. Plug the other end of the audio cable into the adaptor. Plug the adaptor into the LINE OUT jack on your stereo. A. Plug one end of the audio cable into the jack beneath the console. Plug the other end of the audio cable into the LINE OUT jack on your computer. A A CD LINE OUT VCR Amp LINE OUT LINE OUT Audio Cable Adaptor Audio Cable B. Plug one end of the audio cable into the jack beneath the console. Plug the other end of the audio cable into the adaptor. Plug the adaptor into an RCA Y-adaptor (available at electronics stores). Next, remove the wire that is currently plugged into the LINE OUT jack on your stereo and plug the wire into the unused side of the Y-adaptor. Plug the Y-adaptor into the LINE OUT jack on your stereo. B. Plug one end of the audio cable into the jack beneath the console. Plug the other end of the audio cable into the splitter. Plug the splitter into the PHONES jack on your computer. Plug your headphones or speakers into the other side of the splitter. B PHONES B CD VCR Audio Cable Splitter Amp LINE OUT Headphones/Speakers Audio Cable RCA Y-adaptor Adaptor Wire removed from LINE OUT jack HOW TO USE THE MANUAL MODE 1 Begin pedaling to activate the console. The exercise cycle requires no batteries or external power source. Power is supplied by a generator as you pedal. To activate the console, begin pedaling at a speed of about 5 kilometers per hour (3 miles per hour) or faster. After a few seconds, the console displays will light. A tone will then sound and the console will be ready for use. 2 Select the manual mode. When the power is turned on, the Matrix manual mode will be selected. If you have selected a program or the iFIT.com mode, reselect the manual mode by pressing the Program Select button repeatedly until a track appears in the matrix. 3 Begin pedaling and change the resistance of the pedals as desired. As you pedal, change the resistance of the pedals by pressing the Resistance buttons. There are ten resistance levels. Note: After the buttons are pressed, it will take a moment for the pedals to reach the selected resistance level. 4 Monitor your progress with the matrix, the Intensity Level bar, and the two displays. The matrix- When the manual mode or the iFIT.com mode is selected, the matrix will show a track that represents 400 meters (1/4 mile). As you exercise, the indicators around the track will light in succession until the entire track is lit. The track will then darken and the indicators will again begin to light in succession. The Intensity Level bar-The Intensity Level bar will indicate the approximate intensity level of your exercise. Note: During programs, the Intensity Level bar will also prompt you to increase or decrease your pace. The left display- The left display will show the elapsed time, the resistance level of the pedals, your pedaling speed, and the distance you have pedaled. The display will change from one number to the next every few seconds, as shown by the indicators around the display. Note: Each time the resistance of the pedals changes, the display will show the resistance level. When a program is selected, the display will show the time remaining in the program instead of the elapsed time. The right display-The right display will show your power output in watts, your pedaling pace in revolutions per minute (RPM), and the approximate number of calories you have burned. The display will change from one number to the next every few seconds, as shown by the indicators around the display. The display will also show your heart rate when you use the handgrip pulse sensor or the optional chest pulse sensor. 18 11
-
 1
1 -
2
-
3
-
4
-
5
-
 6
6 -
 7
7 -
 8
8 -
 9
9 -
 10
10 -
 11
11 -
 12
12 -
 13
13 -
 14
14
 |
 |
