Image Fitness Imevex4715 Instruction Manual - Page 12
Note: If your stereo has an RCA-type AUDIO OUT
 |
View all Image Fitness Imevex4715 manuals
Add to My Manuals
Save this manual to your list of manuals |
Page 12 highlights
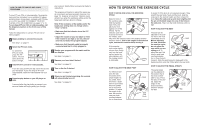
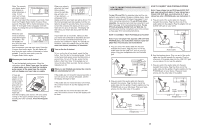
Note: The console can display speed and distance in either kilometers or miles. To find which unit of measurement is selected, you must select the console's user mode. Hold down the Program Select button for about three seconds. The letter "M" for metric kilometers or the letter "E" for English miles will appear in the left display. To change the unit of measurement, press the + button. Whilst the user mode is selected, press the Program Start button. The left display will then show the total number of hours that the exercise cycle has been used. Press the Program Start button again. The left display will then show the total number of kilometers or miles pedaled. To exit the user mode, press the Program Select button again. 5 Measure your heart rate if desired. To use the handgrip pulse sensor, follow the instructions below. Note: If you wear the optional chest pulse sensor and hold the handgrip pulse sensor at the same time, the console will not display your heart rate accurately. If there are sheets of clear Contacts plastic on the metal contacts on the hand- grip pulse sen- sor, peel off the plastic. To measure your heart rate, hold the handgrip pulse sensor, with your palms resting on the upper contacts and your fingers touching the lower contacts. Avoid moving your hands. When your pulse is detected, the Heart Rate indicator above the right display will light, one or two dashes (- -) will appear in the display, and then your heart rate will be shown. For the most accurate heart rate reading, hold the contacts for at least 15 seconds. Note: If you continue to hold the contacts, the display will show your heart rate for up to 30 seconds. The display will then show your heart rate along with the other modes. If your heart rate is not shown, make sure that your hands are positioned as described. Be careful not to move your hands excessively or to squeeze the contacts too tightly. For optimal performance, clean the contacts using a soft cloth; never use alcohol, abrasives, or chemicals. 6 Turn on the fan if desired. To turn on the fan at low speed, press the Fan button. Pivot the fan to the desired angle. To turn on the fan at high speed, press the Fan button a second time. To turn off the fan, press the Fan button a third time. Note: If the pedals are not moved for about thirty seconds, the fan will automatically turn off. 7 When you are finished exercising, the console will automatically turn off. If the pedals are not moved for several seconds, a tone will sound, the console will pause, and the left display will begin to flash. If the pedals are not moved for about one minute, the console will turn off, but the displays will not be reset. If the pedals are not moved for about five minutes, the console will turn off and the displays will be reset. 12 HOW TO CONNECT YOUR CD PLAYER, VCR, OR COMPUTER To use iFIT.com CDs, the exercise cycle must be connected to your portable CD player, portable stereo, home stereo, or computer with CD player. See pages 17 and 18 for connecting instructions. To use iFIT.com videocassettes, the exercise cycle must be connected to your VCR. See page 19 for connecting instructions. To use iFIT.com programs directly from our Web site, the exercise cycle must be connected to your home computer. See page 18 for connecting instructions. HOW TO CONNECT YOUR PORTABLE STEREO Note: If your stereo has an RCA-type AUDIO OUT jack, see instruction A below. If your stereo has a 3.5mm LINE OUT jack, see instruction B. If your stereo has only a PHONES jack, see instruction C. A. Plug one end of the audio cable into the jack beneath the console. Plug the other end of the audio cable into the adaptor. Plug the adaptor into an AUDIO OUT jack on your stereo. A, B HOW TO CONNECT YOUR PORTABLE CD PLAYER Note: If your CD player has separate LINE OUT and PHONES jacks, see instruction A below. If your CD player has only one jack, see instruction B. AUDIO OUT RIGHT LEFT Adaptor A. Plug one end of the audio cable into the jack beneath the console. Plug the other end of the audio cable into the LINE OUT jack on your CD player. Plug your headphones into the PHONES jack. A PHONES LINE OUT LINE OUT PHONES Audio Cable Headphones Audio Cable B. See the drawing above. Plug one end of the audio cable into the jack beneath the console. Plug the other end of the audio cable into the LINE OUT jack on your stereo. Do not use the adaptor. C. Plug one end of the audio cable into the jack beneath the console. Plug the other end of the audio cable into the splitter. Plug the splitter into the PHONES jack on your stereo. Plug your headphones into the other side of the splitter. C B. Plug one end of the audio cable into the jack beneath the console. Plug the other end of the audio cable into the splitter. Plug the splitter into the PHONES jack on your CD player. Plug your headphones into the other side of the splitter. B PHONES PHONES PHONES Audio Cable Splitter Headphones Audio Cable Splitter Headphones 17
-
 1
1 -
2
-
3
-
4
-
5
-
6
-
 7
7 -
 8
8 -
 9
9 -
 10
10 -
 11
11 -
 12
12 -
 13
13 -
 14
14
 |
 |
