Insignia NS-24D420NA16 User Manual (English) - Page 28
Component video (better), On your TV
 |
View all Insignia NS-24D420NA16 manuals
Add to My Manuals
Save this manual to your list of manuals |
Page 28 highlights
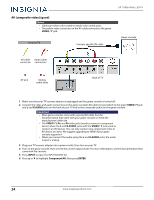
NS-24D420NA16/NS-24D420MX16 24" 1080p 60Hz, LED TV Component video (better) Note Cables are often color-coded to match color-coded jacks. On your TV Console-specific component video and audio cable Component Audio cable video cable connectors connectors Component Analog video jacks audio jacks Back of TV Game console 1 Make sure that your TV's power adapter is unplugged and the game console is turned off. 2 Connect the video and audio connectors on the component video cable (not provided) to the VIDEO / Y, PB, and PR video jacks and L and R AUDIO jacks on the back of your TV and to the component jack(s) on the game console. Important • Your game console may require a special component video cable. See the documentation that came with your game console or check the manufacturer's website. • The VIDEO / Y, PB, and PR video jacks (used to connect a component device) share the L and R AUDIO jacks with the VIDEO / Y jack (used to connect an AV device). You can only connect one component video or AV device at a time. We suggest upgrading to HDMI if your game console supports it. • When you connect the audio using the L and R AUDIO jacks, the audio output is analog. 3 Plug your TV's power adapter into a power outlet, then turn on your TV. 4 Turn on the game console, then set it to the correct output mode. For more information, see the documentation that came with the console. 5 Press INPUT to open the INPUT SOURCE list. 6 Press S or T to highlight Component/AV, then press ENTER. www.insigniaproducts.com 23
-
 1
1 -
2
-
3
-
4
-
5
-
6
-
7
-
8
-
9
-
10
-
11
-
12
-
13
-
14
-
15
-
16
-
17
-
18
-
19
-
20
-
21
-
22
-
 23
23 -
 24
24 -
 25
25 -
 26
26 -
 27
27 -
 28
28 -
 29
29 -
 30
30 -
 31
31 -
 32
32 -
 33
33 -
34
-
35
-
36
-
37
-
38
-
39
-
40
-
41
-
42
-
43
-
44
-
45
-
46
-
47
-
48
-
49
-
50
-
51
-
52
-
53
-
54
-
55
-
56
-
57
-
58
-
59
-
60
-
61
-
62
-
63
-
64
-
65
-
66
-
67
-
68
-
69
-
70
-
71
-
72
-
73
-
74
-
75
-
76
-
77
-
78
-
79
-
80
-
81
 |
 |
