Insignia NS-26L450A11 User Manual (English) - Page 42
Turning Auto Input Sensor on or off, Using INlink, OK/ENTER, INPUT, SETTINGS, Input Sensor
 |
UPC - 600603127069
View all Insignia NS-26L450A11 manuals
Add to My Manuals
Save this manual to your list of manuals |
Page 42 highlights
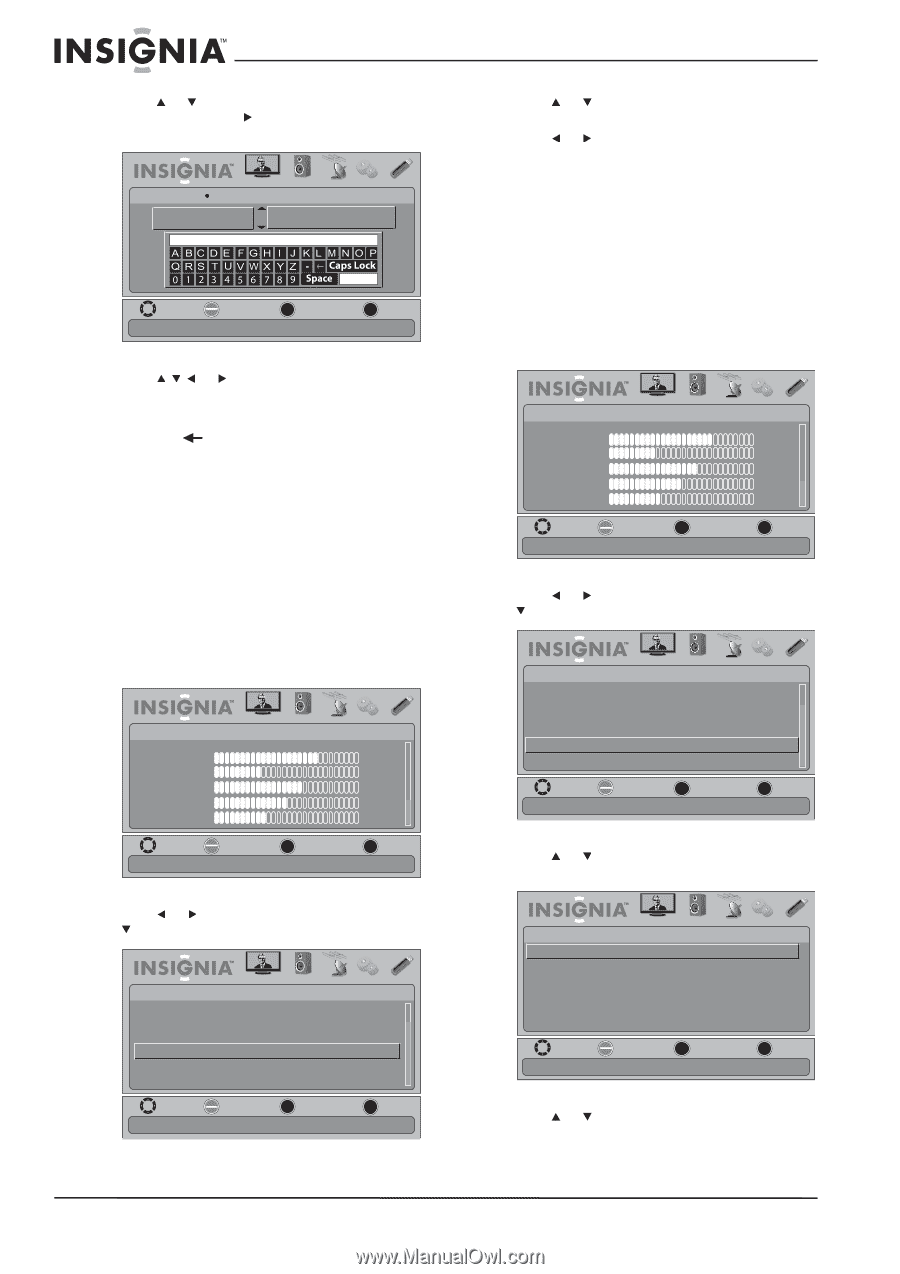
NS-26L450A11/NS-32L450A11 26"/32" LCD, 1080p 4 Press or to select the input source you want to label, then press to move to the custom label field. SETTINGS AV PICTURE AUDIO CHANNELS SETTINGS USB Input Labels GAME GAME_ MOVE Input labels OK ENTER SELECT Enter MENU PREVIOUS EXIT EXIT 5 Press or to highlight a character, then press OK/ENTER. Repeat this step to enter additional characters. You can enter as many as 11 characters. If you need to delete a character, highlight , then press OK/ENTER. 6 When you have completed the label, press MENU. The next time you press INPUT, your label will appear in the Input Source list. 7 Press EXIT to close the menu. Turning Auto Input Sensor on or off When the Input Sensor feature is turned on, your TV automatically detects which video jacks have devices connected to them. Your TV uses this information to determine what options appear on the Input Source list when you press INPUT. To turn Input Sensor on or off: 1 Press MENU. The on-screen menu opens. PICTURE Mode Brightness Contrast Color Tint Sharpness PICTURE AUDIO CHANNELS SETTINGS USB Custom 70 40 60 0 40 MOVE OK ENTER SELECT Adjust settings to affect picture quality MENU PREVIOUS EXIT EXIT 3 Press or to highlight Input Sensor, then press OK/ENTER. A menu opens. 4 Press or to select On (to activate the input sensor) or Off (to deactivate the input sensor). 5 Press MENU to return to the previous menu, or press EXIT to close the menu. Using INlink INlink lets you control HDMI CEC-compatible devices connected to the HDMI jacks on your TV using the remote control that came with your TV. To use INlink, you must set the INlink Control option on the SETTINGS-INlink menu to On. To turn INlink on or off: 1 Press MENU. The on-screen menu opens. PICTURE Mode Brightness Contrast Color Tint Sharpness PICTURE AUDIO CHANNELS SETTINGS USB Custom 70 40 60 0 40 MOVE OK ENTER SELECT Adjust settings to affect picture quality MENU PREVIOUS EXIT EXIT 2 Press or to highlight SETTINGS, then press or OK/ENTER. The SETTINGS menu opens. SETTINGS Menu Settings Input Labels Computer Settings Input Sensor INlink Reset to Default PICTURE AUDIO CHANNELS SETTINGS USB On MOVE OK ENTER SELECT MENU PREVIOUS EXIT EXIT Allow the TV to automatically control CEC devices connected to the TV via HDMI 3 Press or to highlight INlink, then press OK/ENTER. The SETTINGS-INlink menu opens. 2 Press or to highlight SETTINGS, then press or OK/ENTER. The SETTINGS menu opens. SETTINGS Menu Settings Input Labels Computer Settings Input Sensor INlink Reset to Default PICTURE AUDIO CHANNELS SETTINGS USB On MOVE OK ENTER SELECT MENU PREVIOUS Detects devices connected to the ports on the back or side of the TV EXIT EXIT PICTURE SETTINGS•INlink INlink Control Device Auto Power Off TV Auto Power On INlink Device Lists AUDIO CHANNELS SETTINGS USB On On On MOVE OK ENTER SELECT MENU PREVIOUS EXIT EXIT Allow the TV to automatically control CEC devices connected to the TV via HDMI 4 Press or to highlight INlink Control, then press OK/ENTER. A menu opens. 38 www.insigniaproducts.com
-
 1
1 -
2
-
3
-
4
-
5
-
6
-
7
-
8
-
9
-
10
-
11
-
12
-
13
-
14
-
15
-
16
-
17
-
18
-
19
-
20
-
21
-
22
-
23
-
24
-
25
-
26
-
27
-
28
-
29
-
30
-
31
-
32
-
33
-
34
-
35
-
36
-
 37
37 -
 38
38 -
 39
39 -
 40
40 -
 41
41 -
 42
42 -
 43
43 -
 44
44 -
 45
45 -
 46
46 -
 47
47 -
48
-
49
-
50
-
51
-
52
-
53
-
54
-
55
-
56
-
57
-
58
-
59
-
60
-
61
-
62
-
63
-
64
-
65
-
66
-
67
-
68
 |
 |