Insignia NS-46E340A13 User Manual (English) - Page 51
Using a USB flash drive
 |
View all Insignia NS-46E340A13 manuals
Add to My Manuals
Save this manual to your list of manuals |
Page 51 highlights
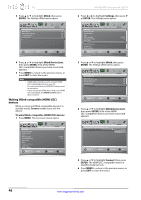
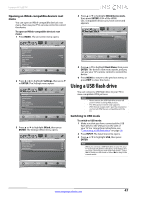
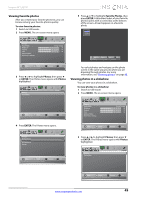
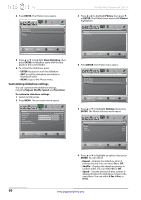
Insignia 46" LED TV Opening an INlink-compatible device's root menu You can open an INlink-compatible device's root menu, then use your TV's remote control to control the device. To open an INlink-compatible device's root menu: 1 Press MENU. The on-screen menu opens. 4 Press S or T to highlight INlink Device Lists, then press ENTER. A list of the HDMI CEC-compatible devices you have connected appears. Picture Audio Settings-INlink-INlink Device Lists HDMI 2: PLAYBACK: BD Player Channels Settings Photos Connect Root Menu Settings Parental Controls Closed Caption Time Menu Language Auto Input Sensing Input Labels INlink Computer Settings System Info Reset to Default Picture Audio Channels Settings Photos English On Move Set various TV options OK ENTER Select MENU Previous EXIT Exit 2 Press W or X to highlight Settings, then press T or ENTER. The Settings menu opens. Settings Parental Controls Closed Caption Time Menu Language Auto Input Sensing Input Labels INlink Computer Settings System Info Reset to Default Picture Audio Channels Settings Photos English On Move OK ENTER Select MENU Previous Allow the TV to automatically control CEC devices connected to the TV via HDMI EXIT Exit 3 Press S or T to highlight INlink, then press ENTER. The Settings-INlink menu opens. Settings-INlink INlink Control Device Auto Power Off TV Auto Power On Audio Receiver INlink Device Lists Picture Audio Channels Settings Photos On Off Off Off MOVE OK ENTER SELECT MENU PREVIOUS Control the menu of the HDMI CEC device with the TV remote control EXIT EXIT 5 Press S or T to highlight Root Menu, then press ENTER. The device's root menu opens, and you can use your TV's remote control to control the device. 6 Press MENU to return to the previous menu, or press EXIT to close the menu. Using a USB flash drive You can connect a USB flash drive to your TV to view compatible JPEG pictures. Notes • • Never remove the USB flash drive or turn off your TV while viewing JPEG pictures. The JPEG picture viewer only supports JPEG-format images (with ".jpg" file extensions) and not all JPEG files are compatible with the TV. Switching to USB mode To switch to USB mode: 1 Make sure that you have connected the USB flash drive to the USB port on the side of your TV. For connection instructions, see "Connecting a USB flash drive" on page 16. 2 Press INPUT. The Input Source list opens. 3 Press S or T to highlight USB, then press ENTER. Note When you connect a USB flash drive to your TV, your TV automatically detects the device and displays the message "Show Photos with USB Flash Drive?". Select Yes to switch to USB mode or select No to stay in the current mode. Move OK ENTER Select MENU Previous Go to device list to register new devices or remove devices from the list EXIT Exit www.insigniaproducts.com 47
-
 1
1 -
2
-
3
-
4
-
5
-
6
-
7
-
8
-
9
-
10
-
11
-
12
-
13
-
14
-
15
-
16
-
17
-
18
-
19
-
20
-
21
-
22
-
23
-
24
-
25
-
26
-
27
-
28
-
29
-
30
-
31
-
32
-
33
-
34
-
35
-
36
-
37
-
38
-
39
-
40
-
41
-
42
-
43
-
44
-
45
-
 46
46 -
 47
47 -
 48
48 -
 49
49 -
 50
50 -
 51
51 -
 52
52 -
 53
53 -
 54
54 -
 55
55 -
 56
56 -
57
-
58
-
59
-
60
-
61
-
62
-
63
 |
 |
