Insignia NS-DV720P User Manual (English) - Page 18
Adjusting the color balance, Imprinting the date and time on pictures, Color Balance - ns dv720pbl tripod
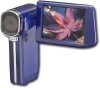 |
UPC - 600603123146
View all Insignia NS-DV720P manuals
Add to My Manuals
Save this manual to your list of manuals |
Page 18 highlights
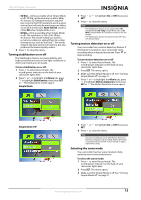
NS-DV720P/NS-DV720PBL 720p HD Digital Camcorder 4 Press or to highlight the Effect tab, press to highlight Scene, then press SET or . The Scene screen opens. 5 Press or to highlight a scene mode, then press SET. You can select: • Auto-Select this option when there are no special lighting conditions. Your camcorder will automatically choose the best settings for your subject. • Backlight-Select this option when there is bright light behind the subject. • Night-Select this option for night scenes or low-light conditions. • Face-Select this option to make skin tones more natural. 6 Press to close the menu. Note To avoid blurry pictures when Night mode is selected, place the camcorder on a flat, steady surface, or use a tripod. Adjusting the color balance Your camcorder automatically adjusts the color balance for most conditions. However, you can manually select the color balance for special conditions. To adjust the color balance: 1 Press to enter Record mode. The record/power indicator on the back of your camcorder lights blue. 2 Press SET. The menu opens. 3 Make sure that Simple Mode is off. See "Turning Simple Mode off" on page 11. 4 Press or to highlight the Effect tab, press to highlight Color Balance, then press SET or . The Color Balance screen opens. 5 Press or to highlight a color balance mode, then press SET. You can select: • Auto-Select this option to let your camcorder automatically adjust the white balance. • Daylight-Select this option when recording movies or taking pictures outdoors. • Fluorescent-Select this option when the light source is fluorescent. • Tungsten-Select this option when the light source is tungsten. 6 Press to close the menu. Imprinting the date and time on pictures You can imprint the date or the date and time on pictures. Note Date and time cannot be imprinted on movies. To imprint the date and time on pictures: 1 Press to enter Record mode. The record/power indicator on the back of your camcorder lights blue. 2 Press SET. The menu opens. 3 Make sure that Simple Mode is off. See "Turning Simple Mode off" on page 11. 4 Press or to highlight the Settings tab. The Settings menu opens. 5 Press to highlight Time Stamp, then press SET or . The Time Stamp screen opens. 14 www.insigniaproducts.com
-
 1
1 -
2
-
3
-
4
-
5
-
6
-
7
-
8
-
9
-
10
-
11
-
12
-
 13
13 -
 14
14 -
 15
15 -
 16
16 -
 17
17 -
 18
18 -
 19
19 -
 20
20 -
 21
21 -
 22
22 -
 23
23 -
24
-
25
-
26
-
27
-
28
 |
 |
