Insignia NS-DV720P User Manual (English) - Page 7
Right, In record mode, In playback mode, In menu mode, In record or playback mode - hd camera
 |
UPC - 600603123146
View all Insignia NS-DV720P manuals
Add to My Manuals
Save this manual to your list of manuals |
Page 7 highlights
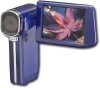
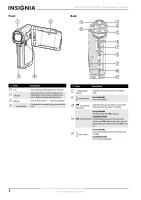
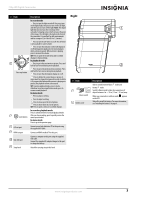
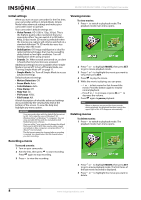
720p HD Digital Camcorder # Item 6 Five-way button 7 (exit) button 8 A/V out port 9 HDMI out port 10 Mini USB port 11 Strap hook Description In record mode Press to turn the light on and off. One press turns on the digital light, two presses tuns on the LED light, and three presses turns off the light. Note: The digital light function increases the sensitivity of the camcorder's imaging sensor, which increases the grain of the image. The LED light is the light on the front of the camcorder. It is excellent for dark environments and has a range of 2 to 4 feet (0.6 to 1.2 meters). Press to turn the self-timer on or off. The self-timer is only available in camera mode. Press to turn the indicators on the LCD display on or off during picture playback or in movie playback when a movie is paused. When a movie is playing, press to increase the volume. SET Press to open the record menu and to confirm changes to menu settings. In playback mode Press to go to the next movie or picture. Press and hold to fast-forward during movie playback. Press to go to the previous movie or picture. Press and hold to fast-reverse during movie playback. Press to turn the information display on or off. Press to delete the current movie or picture. A movie must be stopped (not paused) in order to delete it. If you press this button while a movie is playing or is paused, the playback volume is decreased. SET In picture playback mode, press to start a slideshow. In picture magnification mode, press to resume normal playback. In menu mode Press to adjust a setting. Press to adjust a setting. Press to move up in the list of options. Press to move down in a list of options. SET Press to open a menu or to confirm changes. In record or playback mode Press to switch between record and playback mode. After you stop recording, press to quickly review the movie you recorded. In menu mode Press to go to the previous page. Connect a non-high-definition TV to this port using the supplied A/V cable. Connect an HDMI-enabled TV to this port. Connect a computer to this port using the supplied USB cable. Connect the supplied AC adapter/charger to this port to charge the battery. Attach the carrying strap to this hook. Right # Item 1 Macro switch 2 Battery cover 1 2 Description Slide to switch between Macro mode and Normal mode. Switch to Macro mode to take close-up pictures of objects between 6 in. ~ 10 in. (15 cm ~ 25 cm) away. When your camcorder is in Macro mode, appears on the LCD. Slide off to install the battery. For more information, see "Installing the battery" on page 6. www.insigniaproducts.com 3
-
 1
1 -
 2
2 -
 3
3 -
 4
4 -
 5
5 -
 6
6 -
 7
7 -
 8
8 -
 9
9 -
 10
10 -
 11
11 -
 12
12 -
13
-
14
-
15
-
16
-
17
-
18
-
19
-
20
-
21
-
22
-
23
-
24
-
25
-
26
-
27
-
28
 |
 |
