Insignia NS-IMK20WH7 User Guide - Page 14
Connecting the ice maker to the water supply, Before you begin, please note
 |
View all Insignia NS-IMK20WH7 manuals
Add to My Manuals
Save this manual to your list of manuals |
Page 14 highlights
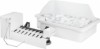
NS-IMK20WH7 Connecting the ice maker to the water supply Before you begin, please note: • This water line installation is not warranted by the refrigerator or ice maker manufacturer. • Follow these instructions carefully to minimize the risk of water damage. • Water hammer (water banging in the pipe) in house plumbing can cause damage to refrigerator parts and lead to water leakage or flooding. Call a qualified plumber to correct water hammer before installing the water supply line to the refrigerator. • To prevent burns and product damage, do not hook up the water line to the hot water line. • If you use your refrigerator before connecting the water line, make sure the ice maker wire signal arm is in the OFF position. • Do not install the ice maker tubing in areas where temperature falls below freezing. • When using any electrical devices (such as power drill) during installation, be sure the device is double insulated or grounded in a manner to prevent the hazard of electric shock, or is battery powered. • All installations must be in accordance with local plumbing code requirements. Warnings • The ice maker should be installed by an authorized service technician. • Make sure that the refrigerator is unplugged to eliminate the danger of electric shock during installation. 1 Disconnect the refrigerator from the electric wall outlet. 2 Remove the parts in the water line kit that you purchased for this purpose. 3 Connect the end of the water supply line to the household cold water line behind the refrigerator. Choose a location for the valve that is easy to access. We recommend that you connect it to the side of a vertical water pipe. If it is necessary to connect it to a horizontal water pipe, make the connection to the top or side, rather than at the bottom, to avoiding drawing off any sediment from the water pipe. 4 Make sure that the household water supply is turned off, then drill a ¼" hole in the water pipe (even if using a self-piercing valve), using a sharp bit. Remove any burrs resulting from drilling the hole. Take care not to allow water to drain into the drill. Failure to drill a ¼" hole may result in reduced ice production or smaller cubes. 5 Fasten the shutoff valve to the cold water pipe with the pipe clamp, then tighten the pipe clamp screws until the sealing washer begin to swell. Do not over-tighten or you may crush the tubing. 14 www.insigniaproducts.com
-
 1
1 -
2
-
3
-
4
-
5
-
6
-
7
-
8
-
 9
9 -
 10
10 -
 11
11 -
 12
12 -
 13
13 -
 14
14 -
 15
15 -
 16
16 -
 17
17 -
 18
18 -
 19
19 -
20
-
21
-
22
 |
 |
