Insignia NS-IMK20WH7 User Guide - Page 16
against any other surface., refrigerator and arrange the coils so they do not vibrate or wear
 |
View all Insignia NS-IMK20WH7 manuals
Add to My Manuals
Save this manual to your list of manuals |
Page 16 highlights
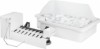
NS-IMK20WH7 11 Slide a brass compression nut, then a ferrule (sleeve), onto the water supply line. 1/4" tubing 1/4" compression nut Water inlet valve 12 Push the end of the tubing into the water inlet valve as far as it will go or ¼-inch, then slide the ferrule (sleeve) into the valve inlet and finger tighten the compression nut onto the valve. Tighten another half turn with a wrench. DO NOT overtighten. 13 Secure the water supply line to the back panel of your refrigerator with a steel clamp and screw at the location shown on the illustration. 14 Coil the excess water supply line (about 2-½ turns) behind the refrigerator and arrange the coils so they do not vibrate or wear against any other surface. 15 Turn on the water supply at the shutoff valve and tighten any connections that leak. 16 Reconnect the refrigerator to the electric wall outlet. 17 To turn on the ice maker, lower the wire signal arm. Important It takes approximately 24 hours for the ice maker to begin producing usable ice. Air in new plumbing lines may cause the ice maker to cycle two or three times before making a full tray of ice. New plumbing may cause ice to be discolored or have poor flavor. Discard ice made during the first 24 hours. 16 www.insigniaproducts.com
-
 1
1 -
2
-
3
-
4
-
5
-
6
-
7
-
8
-
9
-
10
-
 11
11 -
 12
12 -
 13
13 -
 14
14 -
 15
15 -
 16
16 -
 17
17 -
 18
18 -
 19
19 -
 20
20 -
 21
21 -
22
 |
 |
