Insignia NS-IMK20WH7 User Guide - Page 8
down the other side. Save the terminal cover for future use in case the, ice maker is removed.
 |
View all Insignia NS-IMK20WH7 manuals
Add to My Manuals
Save this manual to your list of manuals |
Page 8 highlights
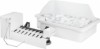
NS-IMK20WH7 8 Insert the two ice maker mounting screws into the holes in the freezer wall. Turn each screw clockwise five times. Ice maker mounting screws 9 Use needle nose pliers to remove the terminal cover located at the top of the freezer by first pulling down one side of the cover, then pulling down the other side. Save the terminal cover for future use in case the ice maker is removed. Terminal Terminal cover 8 www.insigniaproducts.com
-
 1
1 -
2
-
 3
3 -
 4
4 -
 5
5 -
 6
6 -
 7
7 -
 8
8 -
 9
9 -
 10
10 -
 11
11 -
 12
12 -
 13
13 -
14
-
15
-
16
-
17
-
18
-
19
-
20
-
21
-
22
 |
 |

8
NS-IMK20WH7
www.insigniaproducts.com
8
Insert the two ice maker mounting screws into the holes in the freezer
wall. Turn each screw clockwise five times.
9
Use needle nose pliers to remove the terminal cover located at the top
of the freezer by first pulling down one side of the cover, then pulling
down the other side. Save the terminal cover for future use in case the
ice maker is removed.
Ice maker
mounting screws
Terminal
Terminal cover