Insignia NS-LCD42HD User Manual (English) - Page 6
Rear panel view, Remote control
 |
View all Insignia NS-LCD42HD manuals
Add to My Manuals
Save this manual to your list of manuals |
Page 6 highlights
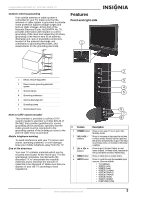
Insignia NS-LCD42HD 42" LCD HD 1080p TV # Feature Description 6 Video Input 1 Connect the composite video output from jack an external video source to this jack. 7 Audio Inputs (L/R) jacks Connect the audio output (L/R) from an external audio source to these jacks. 8 Headphone jack Plug a headphone connector into this jack to listen to the TV on headphones. Inserting a headphone connector mutes the built-in TV speakers. Rear panel view 1 2 3 10 9 8 7 654 # Connection Description 1 HDMI IN (2) Connect to digital A/V equipment that provide HDMI connectivity. HDMI supports enhanced high-definition video and two-channel digital audio on a single cable. 2 VGA IN Connects to your computer's video (VGA port), and audio (L/R) output. 3 AC power plug Plug the AC power plug into a wall outlet. and fuse If the TV will not turn on, check the fuse to compartment determine whether it is blown. Replace if necessary with a 4 A 250 Slowblow fuse (5×20 mm). 4 VHF/UHF IN Connect a 75 Ω antenna cable or Cable TV cable to this connector. 5 Audio Out Digital optical audio out connects through (digital optical a digital optical cable to a digital amplifier, and digital for improved sound reproduction. coaxial) Digital coaxial audio out connects through a digital coaxial cable to a digital amplifier, for improved sound reproduction. 6 Audio Out (stereo) Connects to an external amplifier or home theater system for improved sound reproduction. 7 YPbPr1 and YPbPr2 Connects to component video output (Y=green, Pb=blue, and Pr=red) and audio (L=white and R=red) output of external A/V equipment. 8 S-VIDEO IN Connects to the S-Video and audio (L=white and R=red) output of external A/V equipment. 9 VIDEO 2 IN Connects to the composite video (yellow) and audio (L=white and R=red) output of external A/V equipment. 10 AUDIO (L/R) Provides audio connections (L/R) for DVI input (for DVI to input (which does not carry audio signals HDMI only) on the DVI cable). Remote control 25 24 23 22 21 20 19 18 17 16 15 14 13 12 1 2 3 4 5 6 7 8 9 10 11 # Button 1 POWER 2 MTS/SAP 3 PICTURE 4 ZOOM 5 SLEEP 6 MUTE 7 CH /CH 8 FAVORITE 9 MENU 10 COLOR TEMP. 11 FREEZE 12 CLOCK Description Press to turn your TV on or put it into Standby mode. Press to select a second audio channel (if available). Press to display or select from the various preset picture modes (Normal (default) - Cinema - Sport - User Vivid) Press to display the current picture size. Press repeatedly to cycle through the available picture size options (Normal, Full, Zoom, or Wide) Press to set the sleep timer, which turns off your TV after a preset interval. Press repeatedly to change the setting (10 Min, 20 Min, 30 Min, 40 Min, 50 Min, 60 Min, 90 Min, 120 Min, or OFF). Press to mute the sound. Press again to restore the sound. Press to select the next or previous channel (from memorized channels list). Press to access your favorite channel list. Press to open the on-screen menu, press again to close the on-screen menu. Press to directly access color temperature settings for your TV. Press to freeze the picture on your TV. Press to display the time on the screen. 4 www.insignia-products.com
-
 1
1 -
 2
2 -
 3
3 -
 4
4 -
 5
5 -
 6
6 -
 7
7 -
 8
8 -
 9
9 -
 10
10 -
 11
11 -
 12
12 -
13
-
14
-
15
-
16
-
17
-
18
-
19
-
20
-
21
-
22
-
23
-
24
-
25
-
26
-
27
-
28
-
29
-
30
-
31
-
32
-
33
-
34
-
35
-
36
-
37
-
38
-
39
-
40
-
41
-
42
-
43
-
44
-
45
-
46
-
47
-
48
 |
 |
