Intel AXXRSBBU4 User Guide - Page 10
Align the RAID controller with the PCI-Express slot. On the Intel Server Platform - replacement
 |
View all Intel AXXRSBBU4 manuals
Add to My Manuals
Save this manual to your list of manuals |
Page 10 highlights
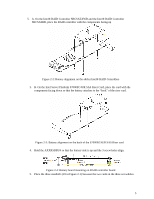
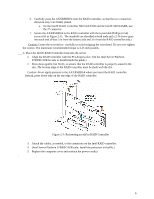
6. Carefully press the AXXRSBBU4 onto the RAID controller, so that the two connectors shown in step 3 are firmly joined. a. On the Intel® RAID Controller SRCSATAWB and the Intel® SRCSASRB, use the J7 connector. 7. Secure the AXXRSBBU4 to the RAID controller with the 6 provided Phillips (2-56) screws (#3 in Figure 2-1). The standoffs are threaded at both ends and a 2-56 screw goes into each end. (Place 3 in from the battery side and 3 in from the RAID controller side.) Caution: Center the screwdriver carefully to avoid stripping the screwhead. Do not over-tighten the screws. The maximum recommended torque is 2.25 inch pounds. C. Place the Intel® RAID Controller back into the server 1. Align the RAID controller with the PCI-Express slot. (On the Intel Server Platform S7000FC4UR be sure to install inside the guide.) 2. Press down gently, but firmly, to ensure that the RAID controller is properly seated in the slot. The bottom edge of the RAID controller must be flush with the slot. Caution: Never apply pressure to the AXXRSBBU4 when you insert the RAID controller. Instead, press down only on the top edge of the RAID controller. Figure 2-5: Reinserting an add-in RAID Controller 3. Attach the cables, as needed, to the connectors on the Intel RAID controller. 4. (Intel Server Platform S7000FC4UR only: Install the processor air baffle.) 5. Replace the computer cover and reattach the power cord(s). . 6
-
 1
1 -
2
-
3
-
4
-
 5
5 -
 6
6 -
 7
7 -
 8
8 -
 9
9 -
 10
10 -
 11
11 -
 12
12 -
 13
13 -
 14
14
 |
 |
