Intel AXXRSBBU4 User Guide - Page 8
Important Pre-installation Considerations, Step-by-step AXXRSBBU4 Installation - processors
 |
View all Intel AXXRSBBU4 manuals
Add to My Manuals
Save this manual to your list of manuals |
Page 8 highlights
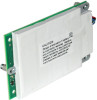
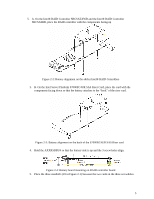
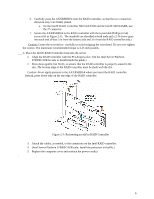
Important Pre-installation Considerations Warning: Always ground yourself and/or use a ground strap before touching the RAID controller or the RSBBU. Perform all installation work at an ESD-safe workstation. Use an ESD-safe Phillips screwdriver set to a maximum torque of 2.25 inch pounds, and be sure the screwdriver is centered in the screw to avoid damaging the screw head. If you exceed the maximum torque specification, you may damage the board, connectors, or screws, and you will void the warranty of the board. The batteries in the RSBBUs must recharge for at least six hours during fast charge under normal operating conditions. To protect your data, Intel recommends that you set the RAID controller Write Policy to writethrough until the battery unit is fully charged. When the battery unit is charged, you can change the Write Policy to write-back to take advantage of the performance improvements of data caching. The maximum ambient temperature for the battery pack is 45°C. Note: The temperature of the battery pack is generally 15-20 degrees higher than the ambient temperature during fast charge. Therefore, to complete the fast charge cycle, ambient temperature should be less than 45°C. If the ambient temperature exceeds 45°C, the fast charge cycle will terminate prematurely, thus preventing the battery pack from reaching a fully charged state. Step-by-step AXXRSBBU4 Installation Follow the steps in this section to install the AXXRSBBU4 on the Intel® RAID Controller SRCSATAWB, SRCSASRB, or SAS Riser card. A. If the RAID controller is already installed in a computer, follow these steps to remove it before you install the AXXRSBBU4: 1 Shut down the computer, turn off the power, and unplug the power cord(s). 2 Remove the cover from the computer and ground yourself before touching the RAID controller. Carefully unplug all cables going to the RAID controller. On the data cables, depress the silver spring at the connector end to make sure the 2 tiny catches release. 3 Following the instructions in User's Guide for your server, carefully remove the RAID controller from its slot. On the Intel® Server Platform S7000FC4UR, you must remove the processor air baffle and push back on the guide latch while pulling up on the riser card. 4 Place the RAID controller on a flat, clean, static-free surface. B. Follow these steps to install the AXXRSBBU4 on the RAID Controller. 1. Ground yourself, and remove the AXXRSBBU4 from the package. 2. Insert the battery pack harness connector (4 in Figure 2-1) at the end of the colored wires into the 5-pin J2 connector (5 in Figure 2-1) on the backside of the AXXRSBBU4. 3. Make sure the 3 standoffs and 6 screws and the Phillips screwdriver are easily available during the following steps. 4. Remove the protective metal cover from the battery connector on the RAID controller card. (J7 on the Intel® SRCSATAWB and Intel® SRCSASRB.) 4
-
 1
1 -
2
-
 3
3 -
 4
4 -
 5
5 -
 6
6 -
 7
7 -
 8
8 -
 9
9 -
 10
10 -
 11
11 -
 12
12 -
 13
13 -
14
 |
 |
