Intel DX79TO Product Guide - Page 37
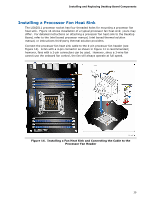
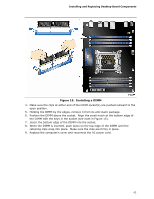
Install the Processor, Installing and Replacing Desktop Board Components
 |
View all Intel DX79TO manuals
Add to My Manuals
Save this manual to your list of manuals |
Page 37 highlights
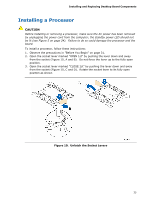
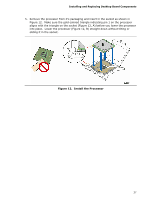
Installing and Replacing Desktop Board Components 5. Remove the processor from it's packaging and insert in the socket as shown in Figure 12. Make sure the gold-colored triangle indicating pin 1 on the processor aligns with the triangle on the socket (Figure 12, A) before you lower the processor into place. Lower the processor (Figure 12, B) straight down without tilting or sliding it in the socket. Figure 12. Install the Processor 37
-
 1
1 -
2
-
3
-
4
-
5
-
6
-
7
-
8
-
9
-
10
-
11
-
12
-
13
-
14
-
15
-
16
-
17
-
18
-
19
-
20
-
21
-
22
-
23
-
24
-
25
-
26
-
27
-
28
-
29
-
30
-
31
-
 32
32 -
 33
33 -
 34
34 -
 35
35 -
 36
36 -
 37
37 -
 38
38 -
 39
39 -
 40
40 -
 41
41 -
 42
42 -
43
-
44
-
45
-
46
-
47
-
48
-
49
-
50
-
51
-
52
-
53
-
54
-
55
-
56
-
57
-
58
-
59
-
60
-
61
-
62
-
63
-
64
-
65
-
66
-
67
-
68
-
69
-
70
-
71
-
72
-
73
-
74
-
75
-
76
-
77
-
78
-
79
-
80
-
81
-
82
-
83
-
84
-
85
-
86
 |
 |

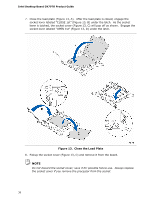
Installing and Replacing Desktop Board Components
37
5.
Remove the processor from it’s packaging and insert in the socket as shown in
Figure 12.
Make sure the gold-colored triangle indicating pin 1 on the processor
aligns with the triangle on the socket (Figure 12, A) before you lower the processor
into place.
Lower the processor (Figure 12, B) straight down without tilting or
sliding it in the socket.
Figure 12.
Install the Processor