Intel ISP4400 Quick Start Guide - Page 16
Attach Rear Bracket, On the right side of the slide assembly, notice that the three screw
 |
View all Intel ISP4400 manuals
Add to My Manuals
Save this manual to your list of manuals |
Page 16 highlights
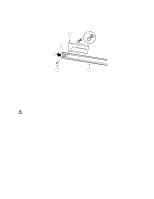
Attach Rear Bracket 1. Remove four #8-32 x 1/2 long pan-head screws, four washers, and four lock nuts from the kit. 2. Extend the intermediate member out from outer member so that you have complete access to the rear part of the outer member. Item B in Figure 9 on page 17 shows in what direction you must extend the intermediate member. Item C in Figure 8 on page 16 shows the extension of the slide rail assembly. On the right side of the slide assembly, notice that the three screw holes in the outer member are accessible. 3. Place one of the brackets labeled FR/RL on the outside of the outer member. The lower tongue of the bracket must be oriented correctly. Item B in Figure 9 on page 17 shows the correct orientation. A B C OM09988 Figure 8. FR/RL Bracket and Extended Slide Rail Assembly A. Rear left bracket B. Lower tongue C. Extended slide assembly The rear left bracket labeled FR/RL. The correct orientation of the lower tongue of the bracket safety latch. The intermediate member is extended so that the three screw holes on the outer member are accessible. 4. Place one of the brackets labeled FR/RL on the outside of the outer member. The lower tongue of the bracket must be oriented correctly. Item B in Figure 6 on page 14 shows the bracket's correct orientation. 5. Align the slot in the bracket with the three holes in the outer member so that all three holes in the outer member are visible through the slot in the bracket. 16 Quick Start Guide
-
 1
1 -
2
-
3
-
4
-
5
-
6
-
7
-
8
-
9
-
10
-
 11
11 -
 12
12 -
 13
13 -
 14
14 -
 15
15 -
 16
16 -
 17
17 -
 18
18 -
 19
19 -
 20
20 -
 21
21 -
22
-
23
-
24
-
25
-
26
-
27
-
28
-
29
-
30
-
31
-
32
-
33
-
34
-
35
-
36
 |
 |
