Intel ISP4400 Quick Start Guide - Page 18
Attach the Slide Assembly to the Rack, Place the Chassis in the Rack
 |
View all Intel ISP4400 manuals
Add to My Manuals
Save this manual to your list of manuals |
Page 18 highlights
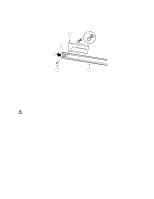
Attach the Slide Assembly to the Rack 1. Obtain at least four screws from your own inventory. 2. Select the holes you are going to use on the rack. 3. Align the holes on one of the front brackets with the holes you selected on the rack. The holes are noted by "A" in Figure 10. A OM09989 Figure 10. Slide Assembly Aligned with Holes in the Vertical Rack 4. As shown in Figure 10, insert two screws in the front bracket and rack holes. Tighten the screws to secure the front of the slide assembly to the rack. 5. Adjust the rear bracket so that it meets the rear vertical rail of the rack. 6. Insert two screws in the rear bracket and rack holes. Tighten the screws to secure the rear of the slide assembly to the rack. 7. Repeat steps 2 through 6 for the other slide assembly. Place the Chassis in the Rack Lift the chassis with hand-truck or other mechanical assist unit so that the inner members on the server line up with the slide assembly attached to the rack. Gently push the chassis into the rack. Make sure that the inner member slides smoothly into the slide assembly in the rack. 18 Quick Start Guide
-
 1
1 -
2
-
3
-
4
-
5
-
6
-
7
-
8
-
9
-
10
-
11
-
12
-
 13
13 -
 14
14 -
 15
15 -
 16
16 -
 17
17 -
 18
18 -
 19
19 -
 20
20 -
 21
21 -
 22
22 -
 23
23 -
24
-
25
-
26
-
27
-
28
-
29
-
30
-
31
-
32
-
33
-
34
-
35
-
36
 |
 |
