Intel ISP4400 Quick Start Guide - Page 17
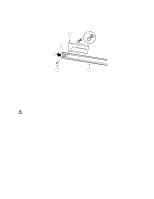
Correct Alignment of the Screw, Washer, Nut, Bracket, and Slide Assembly at the Rear
 |
View all Intel ISP4400 manuals
Add to My Manuals
Save this manual to your list of manuals |
Page 17 highlights
6. Place screws in two of the three holes from inside the intermediate member and loosely tighten with a washer and lock nut. The correct alignment of the screw, washer, lock nut, bracket, and slide assembly is shown in Figure 9. E C A B D OMO9985 Figure 9. Correct Alignment of the Screw, Washer, Nut, Bracket, and Slide Assembly at the Rear A. Extended slide rail assembly B. Extension direction C. Rear left bracket D. Screw E. Washer and lock-nut The slide rail assembly extended so that the screw hole in the outer member is centered in the rectangular hole of the intermediate member. The intermediate member is extended in this direction. Rear left bracket labeled FR/RL. One of two screws used to secure the bracket to the slide rail assembly. Notice what screw holes are used on the outer member. Correct orientation of the washer and lock-nut for each screw. 7. Slide the bracket back and forth. Make sure that the screws are loose enough to allow the bracket to move freely. 8. Repeat steps 2 through 7 for the other slide assembly. SRKA4 /ISP4400 Server System 17
-
 1
1 -
2
-
3
-
4
-
5
-
6
-
7
-
8
-
9
-
10
-
11
-
 12
12 -
 13
13 -
 14
14 -
 15
15 -
 16
16 -
 17
17 -
 18
18 -
 19
19 -
 20
20 -
 21
21 -
 22
22 -
23
-
24
-
25
-
26
-
27
-
28
-
29
-
30
-
31
-
32
-
33
-
34
-
35
-
36
 |
 |
