Intel SC5275-E User Guide - Page 35
that the left and right rails mirror each other., The rails must be installed with the metal flange - drive rails
 |
UPC - 735858171168
View all Intel SC5275-E manuals
Add to My Manuals
Save this manual to your list of manuals |
Page 35 highlights
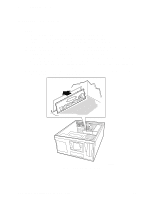
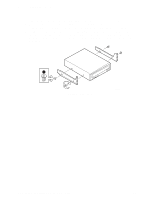
2 Setting Up the Chassis 3. Remove the drive from its protective wrapper and place it on an antistatic surface. 4. Record the drive model and serial numbers in your equipment log. 5. Set any jumpers or switches on the drive according to the drive manufacturer's instructions. 6. Using four screws of the appropriate size and length, attach two slide rails to the drive. Note that the left and right rails mirror each other. The rails must be installed with the metal flange with the screw holes to the front of the drive and the flap with the screw holes must point away from the drive. B Figure 9. Slide Rails TP00081 Intel® Entry Server Chassis SC5275-E User Guide 17
-
 1
1 -
2
-
3
-
4
-
5
-
6
-
7
-
8
-
9
-
10
-
11
-
12
-
13
-
14
-
15
-
16
-
17
-
18
-
19
-
20
-
21
-
22
-
23
-
24
-
25
-
26
-
27
-
28
-
29
-
 30
30 -
 31
31 -
 32
32 -
 33
33 -
 34
34 -
 35
35 -
 36
36 -
 37
37 -
 38
38 -
 39
39 -
 40
40 -
41
-
42
-
43
-
44
-
45
-
46
-
47
-
48
-
49
-
50
-
51
-
52
-
53
-
54
-
55
-
56
-
57
-
58
-
59
-
60
-
61
-
62
-
63
-
64
-
65
-
66
-
67
-
68
-
69
-
70
-
71
-
72
-
73
 |
 |

2
Setting Up the Chassis
Intel® Entry Server Chassis SC5275-E User Guide
17
3.
Remove the drive from its protective wrapper and place it on an antistatic surface.
4.
Record the drive model and serial numbers in your equipment log.
5.
Set any jumpers or switches on the drive according to the drive manufacturer’s instructions.
6.
Using four screws of the appropriate size and length, attach two slide rails to the drive.
Note
that the left and right rails mirror each other.
The rails must be installed with the metal flange
with the screw holes to the front of the drive and the flap with the screw holes must point away
from the drive.
TP00081
B
Figure 9.
Slide Rails