Intel SC5275-E User Guide - Page 40
Insert and tighten the four screws removed in Step 1.
 |
UPC - 735858171168
View all Intel SC5275-E manuals
Add to My Manuals
Save this manual to your list of manuals |
Page 40 highlights
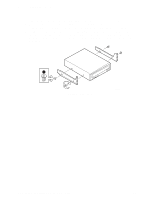
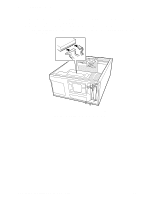
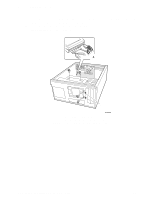
2 Setting Up the Chassis 10. After all drives are installed into the cage, slide the cage into the chassis, making sure the arrow and the screw tabs point toward the top of the chassis. 11. Insert and tighten the four screws removed in Step 1. 12. Attach data and power cables to the drive(s). A B TP00066 A. Data and power cables B. Screw tabs. Point toward top of chassis. Figure 13. Installing the Hard Drive Bay Cage Intel® Entry Server Chassis SC5275-E User Guide 22
-
 1
1 -
2
-
3
-
4
-
5
-
6
-
7
-
8
-
9
-
10
-
11
-
12
-
13
-
14
-
15
-
16
-
17
-
18
-
19
-
20
-
21
-
22
-
23
-
24
-
25
-
26
-
27
-
28
-
29
-
30
-
31
-
32
-
33
-
34
-
 35
35 -
 36
36 -
 37
37 -
 38
38 -
 39
39 -
 40
40 -
 41
41 -
 42
42 -
 43
43 -
 44
44 -
 45
45 -
46
-
47
-
48
-
49
-
50
-
51
-
52
-
53
-
54
-
55
-
56
-
57
-
58
-
59
-
60
-
61
-
62
-
63
-
64
-
65
-
66
-
67
-
68
-
69
-
70
-
71
-
72
-
73
 |
 |

2
Setting Up the Chassis
Intel® Entry Server Chassis SC5275-E User Guide
22
10. After all drives are installed into the cage, slide the cage into the chassis, making sure the arrow
and the screw tabs point toward the top of the chassis.
11. Insert and tighten the four screws removed in Step 1.
12. Attach data and power cables to the drive(s).
TP00066
A
B
A.
Data and power cables
B.
Screw tabs. Point toward top of chassis.
Figure 13.
Installing the Hard Drive Bay Cage