Intel SC5275-E User Guide - Page 45
Install the Access Cover - 16
 |
UPC - 735858171168
View all Intel SC5275-E manuals
Add to My Manuals
Save this manual to your list of manuals |
Page 45 highlights
2 Setting Up the Chassis Install the Access Cover 1. Place the cover so the tabs on the cover fit into the slots on the server. The cover should be flush against the chassis. 2. Slide the cover forward until it stops (letter A in the figure below). 3. Slide the two thumb latches to the right to the "lock" position (letter B in figure). For additional security, you can also replace the shipping screws if desired. B A B TP00067 Figure 16. Installing the Access Cover Intel® Entry Server Chassis SC5275-E User Guide 27
-
 1
1 -
2
-
3
-
4
-
5
-
6
-
7
-
8
-
9
-
10
-
11
-
12
-
13
-
14
-
15
-
16
-
17
-
18
-
19
-
20
-
21
-
22
-
23
-
24
-
25
-
26
-
27
-
28
-
29
-
30
-
31
-
32
-
33
-
34
-
35
-
36
-
37
-
38
-
39
-
 40
40 -
 41
41 -
 42
42 -
 43
43 -
 44
44 -
 45
45 -
 46
46 -
 47
47 -
 48
48 -
 49
49 -
 50
50 -
51
-
52
-
53
-
54
-
55
-
56
-
57
-
58
-
59
-
60
-
61
-
62
-
63
-
64
-
65
-
66
-
67
-
68
-
69
-
70
-
71
-
72
-
73
 |
 |

2
Setting Up the Chassis
Intel® Entry Server Chassis SC5275-E User Guide
27
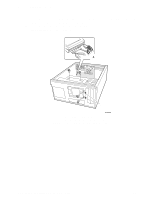
Install the Access Cover
1.
Place the cover so the tabs on the cover fit into the slots on the server.
The cover should be
flush against the chassis.
2.
Slide the cover forward until it stops (letter A in the figure below).
3.
Slide the two thumb latches to the right to the “lock” position (letter B in figure).
For
additional security, you can also replace the shipping screws if desired.
TP00067
A
B
B
Figure 16.
Installing the Access Cover