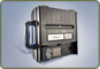
Intermec 6822 6820 Printer Installation Instructions
Intermec 6822 Manual
 |
View all Intermec 6822 manuals
Add to My Manuals
Save this manual to your list of manuals |
Intermec 6822 manual content summary:
- Intermec 6822 | 6820 Printer Installation Instructions - Page 1
Installation Instructions 6820 Printer - Intermec 6822 | 6820 Printer Installation Instructions - Page 2
, and Vista Powered are either trademarks or registered trademarks of Intermec Technologies Corporation. There are U.S. and foreign patents as well as U.S. and foreign patent applications pending. Bluetooth is a trademark of Bluetooth SIG, Inc., U.S.A. ii 6820 Printer Installation Instructions - Intermec 6822 | 6820 Printer Installation Instructions - Page 3
System 13 Securing the Vehicle Battery Cable 13 Grounding the Printer Power Cables 14 Verifying the Printer Power Cable Voltage 15 Installing the Printer 16 Fixed Mount Printer P/N 709-850-006 Mounting Plate (Optional 16 Wall Mount Printer Kits 19 Contents of Flat Paper Tray - P/N 203-486-00 - Intermec 6822 | 6820 Printer Installation Instructions - Page 4
Intermec manuals, contact your local Intermec representative or distributor. Visit the Intermec technical knowledge base (Knowledge Central) at intermec.custhelp.com to review technical information or to request technical support for your Intermec product. iv 6820 Printer Installation Instructions - Intermec 6822 | 6820 Printer Installation Instructions - Page 5
These are available from Intermec Technologies Corporation. Service Order Intermec products Order Intermec media Order spare parts Technical Support Service Service contracts Description • Place an order. • Ask about an existing order. Order printer labels and ribbons. Order spare parts Talk - Intermec 6822 | 6820 Printer Installation Instructions - Page 6
Services and Support Service Location Support For the most current listing of service locations, click Support > Returns and Repairs > Repair Locations. For technical support in South Korea, use the after service : [email protected] OR [email protected] vi 6820 Printer Installation Instructions - Intermec 6822 | 6820 Printer Installation Instructions - Page 7
to the vehicle battery. These kits also contain adjustable wire clamps to secure the cable in place. Note: These instructions are required to install the following kit numbers: P/N 203-242-101 (Fixed Mount and Wall Mount Printers) P/N 203-242-102 (Portable Printers). The 6820 Printer and associated - Intermec 6822 | 6820 Printer Installation Instructions - Page 8
possible, route the printer power cable along with existing vehicle wiring. Use cable ties to join the cable and wiring together. • Use a snap-in bushing (requires 9/16" hole) if the vehicle battery cable passes through the firewall or other sheet-metal. 8 6820 Printer Installation Instructions - Intermec 6822 | 6820 Printer Installation Instructions - Page 9
Crimping Cable Ends To attach a terminal ring and a preassembled in-line fuse link to the vehicle battery cable. Note: You may have to shorten and restrip the red wire when attaching the fuse link assembly strip 1/4" (6 mm) of insulation off the red wire. 6820 Printer Installation Instructions 9 - Intermec 6822 | 6820 Printer Installation Instructions - Page 10
washer, then slip the vehicle positive battery cable onto the bolt. 5 Thread bolt assembly (Steps 2 through 4) into the positive (+) battery terminal. 6 Securely tighten the bolt, then the nut installed in Step 2 to secure washers and cables into place. 10 6820 Printer Installation Instructions - Intermec 6822 | 6820 Printer Installation Instructions - Page 11
extended end of each bolt. 5 Slide the positive (fuse link with red wire) terminal ring from the printer power cable onto the positive (+) battery bolt. 6 Slip a second 3/8" washer onto the bolt, then thread and tighten a second 3/8" nut onto that bolt. 6820 Printer Installation Instructions 11 - Intermec 6822 | 6820 Printer Installation Instructions - Page 12
the negative battery cable wire (black or brown), connecting the wire to the negative battery terminal. 9.52 mm (0.37 in) x 1- 12.7 mm (0.50 in) bolt 9.52 mm (0.37 in) washer (2 places) 12V Vehicle battery cable + - 9.52 mm (0.37 in) nut Fuse holder 12 6820 Printer Installation Instructions - Intermec 6822 | 6820 Printer Installation Instructions - Page 13
Connecting to a Two Battery Vehicle System Securing the Vehicle Battery Cable To secure the vehicle battery cable 1 Secure the vehicle battery cable every 18" (50 cm) with adjustable cable clamps. Work from the battery to the mounting area for the printer. 6820 Printer Installation Instructions 13 - Intermec 6822 | 6820 Printer Installation Instructions - Page 14
hole. 2 Scrape a small circle of paint from around the hole to ensure a good electrical connection. 3 Use a #8 x 5/8" screw and flat washer to secure the strap. 14 6820 Printer Installation Instructions - Intermec 6822 | 6820 Printer Installation Instructions - Page 15
battery or truck charging system is faulty. Do not connect to printer. If zero volts, check the connection done on the previous page. If not zero volts, check the connection to the battery negative terminal and the connection done on the previous page. 6820 Printer Installation Instructions 15 - Intermec 6822 | 6820 Printer Installation Instructions - Page 16
plate option. A mounting plate is not available for the portable printer with the 50-sheet paper tray. Fixed Mount Printer P/N 709-850-006 Mounting Plate (Optional) The angle mounting plate and printer footprint are for the fixed mount printers. Note the keyholes cut into the bottom of the oversize - Intermec 6822 | 6820 Printer Installation Instructions - Page 17
so special tools are not required for securely tightening hardware. 19.0 cm (7.32 in) Angle Mounting Plate (P/N 709-850-006) 29.0 cm (11.36 in) 6820 Printer Installation Instructions 17 - Intermec 6822 | 6820 Printer Installation Instructions - Page 18
The following flat mounting plate has access holes where necessary so special tools are not required for securely tightening hardware. 31.5 cm (12.4 in) 34.3 cm (13.5 in) Flat Mounting Plate (P/N 709-966-006) 2.3 cm (0.9 in) 18 6820 Printer Installation Instructions - Intermec 6822 | 6820 Printer Installation Instructions - Page 19
Flat Paper Tray Mounting Plate 6 1/4" - 20 1/2" bolts (3 needed) 6 1/4" split washers Adapter bracket (discard) 754-548-002 Flat paper tray 714-417-001 Mounting plate The 714-417-001 Mounting Plate also includes a 5" x 4" plate adapter bracket and knob. 6820 Printer Installation Instructions 19 - Intermec 6822 | 6820 Printer Installation Instructions - Page 20
Contents of Compact Paper Tray - P/N 203-489-001 Part Number 650-447-001 801-194-003 803-041-000 Description Compact Paper Tray 2 1/4" - 20 1/2" bolts 2 1/2 split washers 650-447-001 Compact paper tray 20 6820 Printer Installation Instructions - Intermec 6822 | 6820 Printer Installation Instructions - Page 21
43 cm (17 in) 66 cm (26 in) 33 cm (13 in) You need a space that is 17" x 26" x 13" (43 cm x 66 cm x 33 cm) for the mounting plate, wall mount printer, and flat paper tray. 6820 Printer Installation Instructions 21 - Intermec 6822 | 6820 Printer Installation Instructions - Page 22
43 cm (17 in) 56 cm (22 in) 18 cm (7 in) 17" x 22" x 7" (43 cm x 56 cm x 18 cm) is required for the mounting plate, wall mount printer, and compact paper tray. 22 6820 Printer Installation Instructions - Intermec 6822 | 6820 Printer Installation Instructions - Page 23
Installing the Mounting Plate The mounting plate for the wall mount printer hangs on the wall of a vehicle. Install the plate with the knob screw on top and the mounting will have to supply the bolts. 33 cm (13 in) Knob screw 46 cm (18 in) Knob screw 6820 Printer Installation Instructions 23 - Intermec 6822 | 6820 Printer Installation Instructions - Page 24
paper tray in place and insert two 1/4"-20 x 1/2" bolts (with 1/2" split washers) in the holes, through the paper tray. Use a 7/16" wrench to tighten the bolts. Center lip on flat paper tray Bottom lip on mounting plate Center lip on compact paper tray 24 6820 Printer Installation Instructions - Intermec 6822 | 6820 Printer Installation Instructions - Page 25
tighten the bracket onto the mounting plate . Knob screw on mounting plate assembly Knob Plate adaptor bracket Bottom lips on mounting plate assembly Wall mount printer Mount the printer.ep 6820 Printer Installation Instructions 25 - Intermec 6822 | 6820 Printer Installation Instructions - Page 26
Worldwide Headquarters 6001 36th Avenue West Everett, Washington 98203 U.S.A. tel 425.348.2600 fax 425.355.9551 www.intermec.com © 20067 Intermec Technologies Corporation. All rights reserved. 6820 Printer Installation Instructions *931-052-001* P/N 931-052-001
-
 1
1 -
 2
2 -
 3
3 -
 4
4 -
 5
5 -
 6
6 -
 7
7 -
8
-
9
-
10
-
11
-
12
-
13
-
14
-
15
-
16
-
17
-
18
-
19
-
20
-
21
-
22
-
23
-
24
-
25
-
26
 |
 |

6820 Printer
Installation
Instructions