Intermec 6822 6820 Printer Installation Instructions - Page 11
Connecting to a Top-Mount Vehicle Battery
 |
View all Intermec 6822 manuals
Add to My Manuals
Save this manual to your list of manuals |
Page 11 highlights
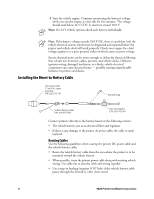
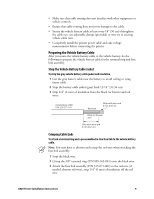
7 Repeat Steps 2 through 6 for the negative vehicle battery cable wire (black or brown), hooking up the negative cable to the negative battery terminal. Vehicle battery 12V 9.52 mm (0.37 in) washer + 9.52 mm (0.37 in) x 1- 12.7 mm (0.50 in) bolt 9.52 mm (0.37 in) nut Vehicle battery cable Connecting to a Top-Mount Vehicle Battery To attach the vehicle battery cable to a top-mount battery terminal 1 Disconnect the negative battery cable, then disconnect the positive battery cable. 2 Remove the bolts from the battery cable and replace these bolts with 3/8" x 1-1/2" bolts and nuts furnished in the installation kit. 3 Reinstall the positive battery cable, then tighten the nut securely. 4 Slip a 3/8" washer onto the extended end of each bolt. 5 Slide the positive (fuse link with red wire) terminal ring from the printer power cable onto the positive (+) battery bolt. 6 Slip a second 3/8" washer onto the bolt, then thread and tighten a second 3/8" nut onto that bolt. 6820 Printer Installation Instructions 11
-
 1
1 -
2
-
3
-
4
-
5
-
 6
6 -
 7
7 -
 8
8 -
 9
9 -
 10
10 -
 11
11 -
 12
12 -
 13
13 -
 14
14 -
 15
15 -
 16
16 -
17
-
18
-
19
-
20
-
21
-
22
-
23
-
24
-
25
-
26
 |
 |
