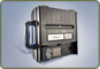
Intermec 6822 6820 Printer Installation Instructions - Page 10
Connecting to a Side-Mount Vehicle Battery
 |
View all Intermec 6822 manuals
Add to My Manuals
Save this manual to your list of manuals |
Page 10 highlights
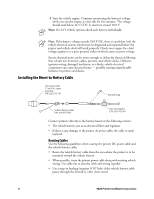
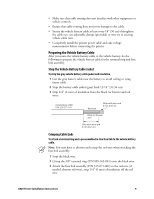
4 Crimp the red wire onto the fuse link. 9.525 mm (0.37 in) terminal ring Black (or brown) wire Vehicle battery cable Red Fuse link assembly wire P/N: 236-107-001 Connecting to the Vehicle Battery Your vehicle has either a top-mount battery with the terminals on the top, a side-mount battery with terminals on the side, or two top-mount batteries with the terminals on the top. Determine which battery is in your vehicle and proceed with applicable instructions. Connecting to a Side-Mount Vehicle Battery To attach the vehicle battery cable to a side-mount battery terminal 1 Disconnect the negative battery cable, then disconnect the positive battery cable, and remove the bolts from each cable. 2 Screw a 3/8" nut as far as it will go onto a 3/8" x 1-1/2" bolt furnished in kit, then slip a 3/8" washer onto the bolt. 3 Slide the positive (red wire with fuse link) terminal ring from the printer power cable onto the bolt. 4 Slip a second 3/8" washer, then slip the vehicle positive battery cable onto the bolt. 5 Thread bolt assembly (Steps 2 through 4) into the positive (+) battery terminal. 6 Securely tighten the bolt, then the nut installed in Step 2 to secure washers and cables into place. 10 6820 Printer Installation Instructions
-
 1
1 -
2
-
3
-
4
-
 5
5 -
 6
6 -
 7
7 -
 8
8 -
 9
9 -
 10
10 -
 11
11 -
 12
12 -
 13
13 -
 14
14 -
 15
15 -
16
-
17
-
18
-
19
-
20
-
21
-
22
-
23
-
24
-
25
-
26
 |
 |
