Intermec PX4i Printer 802.11 Radio Interface Kit Installation Instructions
Intermec PX4i Manual
 |
View all Intermec PX4i manuals
Add to My Manuals
Save this manual to your list of manuals |
Intermec PX4i manual content summary:
- Intermec PX4i | Printer 802.11 Radio Interface Kit Installation Instructions - Page 1
Printer 802.11 Radio Interface Kit PD41, PD42, PF2i, PF4i, PM4i, PX4i, PX6i Installation Instructions - Intermec PX4i | Printer 802.11 Radio Interface Kit Installation Instructions - Page 2
purpose of allowing customers to operate and service Intermec-manufactured equipment and is not to be released, reproduced, or used for any other purpose without written permission of Intermec Technologies Corporation. Information and specifications contained in this document are subject to change - Intermec PX4i | Printer 802.11 Radio Interface Kit Installation Instructions - Page 3
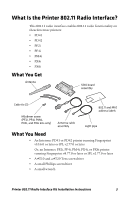
PX6i kits only) Antenna cable assembly 802.11 and MAC address labels Light pipe What You Need • An Intermec PD41 or PD42 printer running Fingerprint v10.6.0 or later or IPL v2.77.0 or later Or, an Intermec PF2i, PF4i, PM4i, PX4i, or PX6i printer running Fingerprint v8.77.0 or later or IPL v2.77 - Intermec PX4i | Printer 802.11 Radio Interface Kit Installation Instructions - Page 4
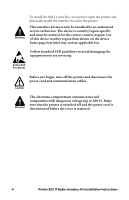
board in the printer. This interface kit must only be installed by an authorized service technician. The device is country/region specific and must be ordered for the correct country/region. Use of this device in other region than shown on the device home page/test label may violate applicable - Intermec PX4i | Printer 802.11 Radio Interface Kit Installation Instructions - Page 5
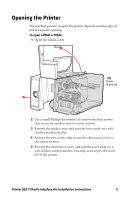
The method you use to open the printer depends on what type of printer you are opening. To open a PD41 or PD42 1 Open the media cover. Screw (6 places) soft cloth to avoid scratches. You may need to pry the cover off of the printer. Printer 802.11 Radio Interface Kit Installation Instructions 5 - Intermec PX4i | Printer 802.11 Radio Interface Kit Installation Instructions - Page 6
To open a PF2i or PF4i 1 Open the media cover. Screw (3 places) 2 Use a #T20 Torx screwdriver to remove the three screws that secure up so it disengages from the bottom plate. 4 Put the cover aside on a soft cloth to avoid scratches. 6 Printer 802.11 Radio Interface Kit Installation Instructions - Intermec PX4i | Printer 802.11 Radio Interface Kit Installation Instructions - Page 7
the lower left edge and front of the bottom plate. 6 Remove the electronics cover and put the cover aside on a soft cloth to avoid scratches. Printer 802.11 Radio Interface Kit Installation Instructions 7 - Intermec PX4i | Printer 802.11 Radio Interface Kit Installation Instructions - Page 8
To open a PX4i or PX6i 1 Use a #T10 Torx screwdriver to remove the eight screws that secure the electronics cover. Screw (4 places) Screw (4 places) 2 Put the cover aside on a soft cloth to avoid scratches. 8 Printer 802.11 Radio Interface Kit Installation Instructions - Intermec PX4i | Printer 802.11 Radio Interface Kit Installation Instructions - Page 9
the 802.11 interface in a PD41, PD42, PM4i, PF2i, PF4i, PX4i, and PX6i printer. To install the 802.11 interface 1 Insert the antenna cable screw from the printer. Antenna cable assembly Back plate M3x8mm screw SDIO board assembly Printer 802.11 Radio Interface Kit Installation Instructions 9 - Intermec PX4i | Printer 802.11 Radio Interface Kit Installation Instructions - Page 10
SDIO board assembly with the screw. 7 (PF2i, PF4i, PM4i, PX4i, and PX6i) Secure the SDIO printer as shown. 12 Trim the excess from the cable tie. 13 Close the printer. 14 Connect the antenna to the antenna connector on the back plate. 10 Printer 802.11 Radio Interface Kit Installation Instructions - Intermec PX4i | Printer 802.11 Radio Interface Kit Installation Instructions - Page 11
15 Affix the labels to the appropriate locations on the printer. PD41 or PD42 802.11 Label 802.11 label PF2i 802.11 and MAC Address Labels 802.11 label MAC address labels Printer 802.11 Radio Interface Kit Installation Instructions 11 - Intermec PX4i | Printer 802.11 Radio Interface Kit Installation Instructions - Page 12
PF2i Serial Number Label Serial number and RF logo (POD label) Safety and EMC logo (POD label) PF2i and PF4i Safety Label 12 Printer 802.11 Radio Interface Kit Installation Instructions - Intermec PX4i | Printer 802.11 Radio Interface Kit Installation Instructions - Page 13
802.11 label Serial number and RF logo (POD label) MAC address labels PF4i 802.11, Serial Number, and MAC Address Labels 802.11 label Safety and EMC logo (POD label) PM4i Safety and 802.11 Labels Printer 802.11 Radio Interface Kit Installation Instructions 13 - Intermec PX4i | Printer 802.11 Radio Interface Kit Installation Instructions - Page 14
Serial Number and MAC Address Labels MAC address labels MAC address labels 802.11 label Serial number and RF logo (POD label) Safety and EMC logo (POD label) PX4i and PX6i MAC Address, Safety, Serial Number, and 802.11 Labels 14 Printer 802.11 Radio Interface Kit Installation Instructions - Intermec PX4i | Printer 802.11 Radio Interface Kit Installation Instructions - Page 15
- Intermec PX4i | Printer 802.11 Radio Interface Kit Installation Instructions - Page 16
Worldwide Headquarters 6001 36th Avenue West Everett, Washington 98203 U.S.A. tel 425.348.2600 fax 425.355.9551 www.intermec.com © 2010 Intermec Technologies Corporation. All rights reserved. Printer 802.11 Radio Interface Kit Installation Instructions *931-064-002* P/N 931-064-002
-
 1
1 -
 2
2 -
 3
3 -
 4
4 -
 5
5 -
 6
6 -
 7
7 -
8
-
9
-
10
-
11
-
12
-
13
-
14
-
15
-
16
 |
 |

Printer 802.11 Radio Interface Kit
PD41, PD42, PF2i, PF4i, PM4i, PX4i, PX6i
Installation Instructions