Intermec PX4i Printer 802.11 Radio Interface Kit Installation Instructions - Page 9
Installing the 802.11 Interface
 |
View all Intermec PX4i manuals
Add to My Manuals
Save this manual to your list of manuals |
Page 9 highlights
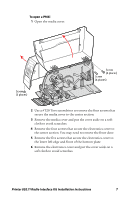
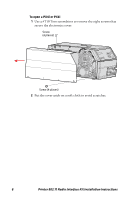
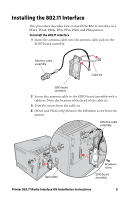
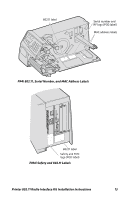
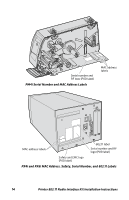
Installing the 802.11 Interface This procedure describes how to install the 802.11 interface in a PD41, PD42, PM4i, PF2i, PF4i, PX4i, and PX6i printer. To install the 802.11 interface 1 Insert the antenna cable into the antenna cable jack on the SDIO board assembly. Antenna cable assembly Cable tie SDIO board assembly 2 Secure the antenna cable to the SDIO board assembly with a cable tie. Note the location of the head of the cable tie. 3 Trim the excess from the cable tie. 4 (PD41 and PD42 only) Remove the M3x8mm screw from the printer. Antenna cable assembly Back plate M3x8mm screw SDIO board assembly Printer 802.11 Radio Interface Kit Installation Instructions 9
-
 1
1 -
2
-
3
-
 4
4 -
 5
5 -
 6
6 -
 7
7 -
 8
8 -
 9
9 -
 10
10 -
 11
11 -
 12
12 -
 13
13 -
 14
14 -
15
-
16
 |
 |

Printer 802.11 Radio Interface Kit Installation Instructions
9
Installing the 802.11 Interface
This procedure describes how to install the 802.11 interface in a
PD41, PD42, PM4i, PF2i, PF4i, PX4i, and PX6i printer.
To install the 802.11 interface
1
Insert the antenna cable into the antenna cable jack on the
SDIO board assembly.
2
Secure the antenna cable to the SDIO board assembly with a
cable tie. Note the location of the head of the cable tie.
3
Trim the excess from the cable tie.
4
(PD41 and PD42 only) Remove the M3x8mm screw from the
printer.
Antenna cable
assembly
SDIO board
assembly
Cable tie
M3x8mm
screw
SDIO board
assembly
Antenna cable
assembly
Back plate