Invacare M94 Owners Manual - Page 54
Replacing the Seat Positioning Strap
 |
View all Invacare M94 manuals
Add to My Manuals
Save this manual to your list of manuals |
Page 54 highlights
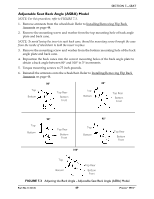
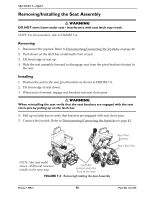
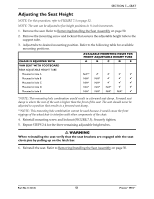
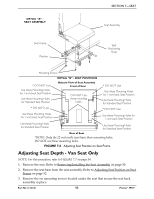
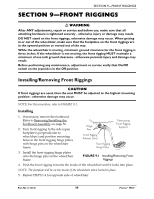
SECTION 7-SEAT 4. Adjust seat back assembly to desired position and reinstall the six mounting screws. Securely tighten. NOTE: Refer to Detail "A" of FIGURE 7.7 for proper seat depth positions. For example, to achieve maximum seat depth, the front mounting hole on the seat back bracket aligns with the third hole on the seat base. 5. Reinstall the seat base onto the seat assembly. Refer to Adjusting Seat Position on Seat Frame on page 52. 6. Reinstall the seat. Refer to Removing/Installing the Seat Assembly on page 50. Seat Back Seat Back Bracket Mounting Holes Seat Base DETAIL "A" - SEAT DEPTH POSITIONS NOTE: Seat depth maximum is at the third seat hole. Minimum Seat Depth Seat Depth Seat Size 16 inch 16 X 18 inch 16 inch 18 X 18 inch 18 inch 20 X 20 inch 18 inch 22 X 20 inch Mounting Screws Mounting Holes Middle Seat Depth Seat Depth Seat Size 17 inch 16 X 18 inch 17 inch 18 X 18 inch 19 inch 20 X 20 inch 19 inch 22 X 20 inch Maximum Seat Depth Seat Depth Seat Size 18 inch 16 X 18 inch 18 inch 18 X 18 inch 20 inch 20 X 20 inch 20 inch 22 X 20 inch FIGURE 7.7 Adjusting Seat Depth - Van Seat Only Replacing the Seat Positioning Strap ASBA Model NOTE: For this procedure, refer to FIGURE 7.8 on page 55. 1. Remove the seat cushion from the seat pan. 2. Move the flip back armrests out of the way. Refer to Adjusting Flip Back Armrests on page 45. 3. Remove the two mounting screws, quick release pin tabs, spacers, and locknuts that secure the seat pan and seat positioning straps to the seat frame. Pronto® M94™ 54 Part No 1122145
-
 1
1 -
2
-
3
-
4
-
5
-
6
-
7
-
8
-
9
-
10
-
11
-
12
-
13
-
14
-
15
-
16
-
17
-
18
-
19
-
20
-
21
-
22
-
23
-
24
-
25
-
26
-
27
-
28
-
29
-
30
-
31
-
32
-
33
-
34
-
35
-
36
-
37
-
38
-
39
-
40
-
41
-
42
-
43
-
44
-
45
-
46
-
47
-
48
-
 49
49 -
 50
50 -
 51
51 -
 52
52 -
 53
53 -
 54
54 -
 55
55 -
 56
56 -
 57
57 -
 58
58 -
 59
59 -
60
-
61
-
62
-
63
-
64
-
65
-
66
-
67
-
68
-
69
-
70
-
71
-
72
-
73
-
74
-
75
-
76
-
77
-
78
-
79
-
80
 |
 |
