JVC BR-DV3000UB BR-DV3000U Pro-DV recorder 71 page instruction manual - Page 8
Front panel
 |
UPC - 046838325595
View all JVC BR-DV3000UB manuals
Add to My Manuals
Save this manual to your list of manuals |
Page 8 highlights
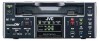
NAMES AND FUNCTIONS OF VARIOUS PARTS - Front panel - (continued) 8 9 OPERATE EJECT Mini A.DUB PROFESSIONAL MIC REMOTE SEL. INPUT SEL. SERIAL LINE 9PIN WIRELESS DV Y/C DVCAM NTSC PAL REC INH. CH-1/3 CH-2/4 BR-DV3000 MENIU REC PLAY PAUSE SET REW STOP FF 0 ! 8 [REC] Record button/LED ● Hold down this button and press the 9 PLAY button to start recording. During recording, the LED lights up red. ● Hold down this button and press the 0 PAUSE button to pause the recording. ● When this button is pressed during recording, an index signal is recorded on the tape (valid when the INDEX WRITE item in the SYSTEM menu is set to ON). ● When recording is stopped, the time code generator value can be verified by holding this button down. If the TC DUPLICATE menu item is set to AUTO or NON DROP, EE signals of the DV Input time code and Date/Time can be verified. 9 [PLAY] Play button/LED ● Press this button to start playing back a tape. During playback, the LED lights up green. ● When recording is paused, press this button to resume recording. ● When the menu is displayed, use this button to select the menu items or setting values. 0 [PAUSE] Pause button/LED ● During recording, press this button to pause it. During playback or STOP mode, press this button to enter the STILL mode. When recording is paused or when the unit is in the STILL mode, the LED lights up green. ● If this button is pressed simultaneously with the A.DUB button in the STILL mode, the Audio Dubbing Pause mode will be engaged. ● When the menu is displayed, use this button to confirm the menu items or setting values. 12 # @ ! [FF] Fast forward button/LED ● When the unit is in the STOP mode, press this button to execute fast-forward winding of the tape. ● When the unit is in the PLAYBACK or STILL mode, press this button to execute fast-forward playback. The Fast-forward playback speed changes in the following sequence each time this button is pressed: X20¥X5¥X9¥X20... In the DVCAM mode, the maximum speed is 15X. ● During fast-forward winding or fast-forward playback, the LED lights up green. ● When the menu is displayed, use this button to display selected menu items. ● When setting up the date, time or time code, use this button to select the data segment. @ [STOP] Stop button/LED ● Press this button to stop operation. (of rewind, playback, etc.) ● When the menu is displayed, use this button to select the menu items or setting values. # [REW] Rewind button/LED ● When the unit is in the STOP mode, press this button to rewind the tape. ● When the unit is in the PLAYBACK or STILL mode, press this button to execute reverse playback. The Reverse playback speed changes in the following sequence each time this button is pressed: X20¥X5¥X9¥X20... In the DVCAM mode, the maximum speed is 15X. ● During rewinding or reverse playback, the LED lights up green. ● When the menu is displayed, press this button to return to the previous screen. When setting up the date, time or time code, use this button to select the data segment. % $^ OPERATE Mini A.DUB PROFESSIONAL MIC REMOTE SEL. INPUT SEL. SERIAL LINE 9PIN WIRELESS DV Y/C DVCAM NTSC PAL REC INH. CH-1/3 CH-2/4 BR-DV3000 EJECT MENIU REC PLAY PAUSE SET REW STOP FF $ Indicator DVCAM : When a cassette is loaded, the LED lights up green. (Likewise when the unit is in the OPERATE OFF state.) When a cassette is being loaded or ejected, the LED blinks. : When the unit plays back a tape recorded in the DVCAM format, the LED lights up green. NTSC : The LED lights up green in the following cases: • In the composite video or YC video signal input mode and the 2 NTSC/PAL switch located at the rear panel is set as "NTSC". • A tape recorded with NTSC sig- nals is played back. • When NTSC signals are input while the INPUT SEL switch is set at DV. PAL : The LED lights up green in the fol- lowing cases: • In the composite video or YC video signal input mode and the 2 NTSC/PAL switch located at the rear panel is set as "PAL". • A tape recorded with PAL signals is played back. • When PAL signals are input while the INPUT SEL switch is set at DV. REC INH : The LED lights up red for about 5 seconds when the unit is set to the recording mode but fails to record. E.g. when the rear slide of the cassette is pushed to the "SAVE" position. % Audio indicator This indicator allows the user to check the availability of audio signals. 3 indicators each are available to CH1/3 and Ch2/4. ^ Sensor for wireless remote controller When using the provided wireless remote controller, please point it to this sensor. (☞ Page 25, "USING THE WIRELESS RE- MOTE CONTROLLER" 13
-
 1
1 -
2
-
 3
3 -
 4
4 -
 5
5 -
 6
6 -
 7
7 -
 8
8 -
 9
9 -
 10
10 -
 11
11 -
 12
12 -
 13
13 -
14
-
15
-
16
-
17
-
18
-
19
-
20
-
21
-
22
-
23
-
24
-
25
-
26
-
27
-
28
-
29
-
30
-
31
-
32
-
33
-
34
-
35
-
36
-
37
 |
 |
