JVC C205U Instruction Manual - Page 9
Installation and connection, Others
 |
UPC - 046838021497
View all JVC C205U manuals
Add to My Manuals
Save this manual to your list of manuals |
Page 9 highlights
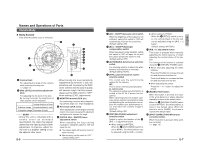
English Installation and connection Adjusting the Camera Angle (Continued) Ⅲ Attach the dome cover. Set the dome cover to the unit by aligning the 3 marks on the camera and dome cover (I, II and III). CAUTION Be sure that the dome cover is firmly attached. Improper attachment could result in the cover dropping down. Others About White-spot correction As a general characteristic unique to CCD, white spots may appear on the screen when operating under high temperature. In order to reduce this phenomenon, this unit is equipped with a white-spot correction feature. FOCUS ADJ. OFF OFF OFF AUTO LL PHASE ON ON-AGC ON-BLC MANU INT WHT.BAL. R B SPOT RESET CORRECTION Usage 1. Remove the dome cover. • Switch on the camera power supply and wait for at least 30 minutes. 2. Cover the lens surface using a black sheet of paper, etc. so that light does not enter the lens. 3. Press and hold the SPOT CORRECTION button on the unit for more than 2 seconds. • White-spot correction will start. Correction may take several seconds for completion. Memo: • The white-spot correction feature of this unit does not guarantee the correction of all white spots. Maximum correction: less than 16 ~ 32 spots Depending on the characteristic of white spots, correction may not be possible. • When performing white-spot correction, accurate data may not be achieved in case of highly-detailed pixels since correction is made using the information of surrounding pixels. • The result of white-spot correction is maintained until the next correction is performed. E-14 E-15
-
 1
1 -
2
-
3
-
 4
4 -
 5
5 -
 6
6 -
 7
7 -
 8
8 -
 9
9 -
 10
10
 |
 |
