JVC DLA-HD10KSU DLA-HD10K Owner's Manual (50 pages) - Page 30
Procedures for Menu Operation
 |
View all JVC DLA-HD10KSU manuals
Add to My Manuals
Save this manual to your list of manuals |
Page 30 highlights
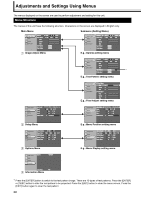
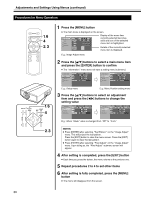
Adjustments and Settings Using Menus (continued) Procedures for Menu Operation ON OPERATE OFF CHP LIGHT TEST MENU EXIT ENTER a, f d b, c PRESET T ZOOM W HIDE FOCUS a Press the [MENU] button ● The main menu is displayed on the screen. Image Adjust Setup Options Information Gamma Color Temp. Red Green Blue Test Pattern Pixel Adjust Normal D65 A B Custom User1 User2 ENTER ENTER Display of the menu item currently selected becomes solid and icon of the selected menu item is highlighted. Details of the currently selected menu item is displayed. E.g.: Image Adjust menu b Press the [J/K] buttons to select a main menu item and press the [ENTER] button to confirm ● The AInformationB menu does not have a setting menu (submenu). Image Adjust Setup Options Information Menu Position Mask Flip H Flip V Picture Shift 2.5% 5% Off On Off On Off 0 Image Adjust Setup Options Information Menu Position Mask Flip H Flip V Picture Shift 2.5% 5% Off On Off On Off 0 T + RS232C Rx Tx MENU a, f OPERATE EXIT ON d OPERATE OFF FOCUS ZOOM HIDE - W b, c E.g.: Setup menu E.g.: Menu Position setting menu c Press the [J/K] buttons to select an adjustment item and press the [H/I] buttons to change the setting value Image Adjust Setup Options Information Menu Position Mask Flip H Flip V Picture Shift 2.5% 5% Off On Off On Off 0 Image Adjust Setup Options Information Menu Position Mask Flip H Flip V Picture Shift 2.5% 5% Off On Off On Off 0 E.g.: When AMaskB value is changed from AOffB to A2.5%B NOTES: ● Press [ENTER] after selecting ATest PatternB on the AImage AdjustB menu. This will project the test pattern. Press the [EXIT] button to clear the menu screen. Press the [EXIT] button again to clear the test pattern. ● Press [ENTER] after selecting APixel AdjustB on the AImage AdjustB menu. Upon doing so, the APixel AdjustB submenu screen will appear. d After setting is completed, press the [EXIT] button ● Each time you press the button, the menu returns to the previous one. e Repeat procedures 2 to 4 to set other items f After setting is fully completed, press the [MENU] button ● The menu will disappear from the screen. 30
-
 1
1 -
2
-
3
-
4
-
5
-
6
-
7
-
8
-
9
-
10
-
11
-
12
-
13
-
14
-
15
-
16
-
17
-
18
-
19
-
20
-
21
-
22
-
23
-
24
-
 25
25 -
 26
26 -
 27
27 -
 28
28 -
 29
29 -
 30
30 -
 31
31 -
 32
32 -
 33
33 -
 34
34 -
 35
35 -
36
-
37
-
38
-
39
-
40
-
41
-
42
-
43
-
44
-
45
-
46
-
47
-
48
-
49
-
50
 |
 |
