JVC FS-G6 Instruction Manual - Page 11
Getting Started
 |
View all JVC FS-G6 manuals
Add to My Manuals
Save this manual to your list of manuals |
Page 11 highlights
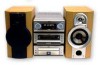
English Getting Started Unpacking After unpacking, check to be sure that you have all the following items. The number in the parentheses indicates the quantity of the pieces supplied. • AM loop antenna (1) • FM antenna (1) • Remote control (1) • Batteries (2) • Speaker cords (2) • External wire (1) Connecting the System Control Cables and the External Wire FS-G6 compact component system consists of three units, AX-UXG6 Stereo Amplifier, XT-UXG6 Compact Disc/ Tuner, TD-UXG6 Cassette Deck, and SP-UXG6 Speaker System. You can easily connect these units using the system control cables equipped on the rear panel of the units. • To prevent malfunction, connect the external wire as illustrated. If any is missing, consult your dealer immediately. Putting the Batteries into the Remote Control Insert the batteries - R6P (SUM-3)/AA (15F) - into the remote control, by matching the polarity (+ and -) on the batteries with the + and - markings on the battery compartment. When the remote control can no longer operate the units, replace both batteries at the same time. External wire (supplied) 1 2 3 AX-UXG6 FROM CONNECTOR-A XT-UXG6 TO CONNECTOR-A FROM CONNECTOR-B TD-UXG6 TO CONNECTOR-B 1 DO NOT change vertical stacking order of the units as illustrated to avoid heat buildup. R6P(SUM-3)/AA(15F) 2 3 • To connect the cables, press the middle of the connector body until it clicks into the connector on the rear panel. • To disconnect, if needed, pull the connector out pushing both sides of the connector body. Never pull out the cables themselves. To connect To disconnect • DO NOT use an old battery together with a new one. • DO NOT use different types of batteries together. • DO NOT expose batteries to heat or flame. • DO NOT leave the batteries in the battery compartment when you are not going to use the remote control for an extended period of time. Otherwise, it will be damaged from battery leakage. When connecting the system control cables to the connectors Make sure to connect the cable to the connector having the same name such as "FROM CONNECTOR-A" and "TO CONNECTOR-A." 6
-
 1
1 -
2
-
3
-
4
-
5
-
 6
6 -
 7
7 -
 8
8 -
 9
9 -
 10
10 -
 11
11 -
 12
12 -
 13
13 -
 14
14 -
 15
15 -
 16
16 -
17
-
18
-
19
-
20
-
21
-
22
-
23
-
24
-
25
-
26
-
27
-
28
-
29
-
30
-
31
-
32
-
33
-
34
-
35
-
36
-
37
-
38
-
39
-
40
 |
 |
