JVC GS-TD1BUS Detailed User Guide - Page 30
Scenes of Intelligent Auto, Operation Buttons for Video Recording
 |
View all JVC GS-TD1BUS manuals
Add to My Manuals
Save this manual to your list of manuals |
Page 30 highlights
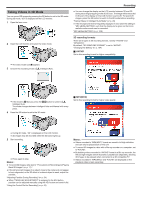
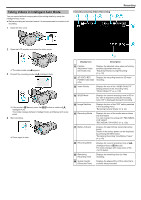
Recording o Scenes of Intelligent Auto Display Icon Description E Captures one's skin beautifully. A Allows people to be captured naturally. D Focuses at a far distance and captures a sharp image with vivid colors. I Records with minimal noise in the overall image. B Allows night scenes to be captured accurately with minimal noise in the overall image. J Prevents colors from fading even when recording in a bright environment. G Records while focusing on a near object. H Reproduces the green color of trees vividly. F Reproduces the colors of sunset naturally. C Adjusts settings so that the subject does not appear too dark due to backlight. K Allows people to be captured naturally with minimal noise in the overall image. L Records while focusing on a near object even in a dark environment. Memo : 0 Scenes can be detected according to the shooting conditions and automatically adjusted in Intelligent Auto mode. 0 Some functions may not work properly depending on the shooting conditions. Operation Buttons for Video Recording . Operation Button Description 1 Parallax Adjustment Adjusts the 3D effect when 3D images are displayed on the LCD monitor. "Adjusting Parallax During Recording" (A p. 34) 2 / 3 T/W Zoom Allows the same functions as the zoom lever to be performed. Camera shake that often occurs when using the zoom lever can be minimized. "Zooming" (A p. 31) 4 Recording/ Playback Mode Switches between recording and playback modes. 5 / 6 Recording Start g Record-Standby a Functions as the START/STOP button. 7 LCD Monitor 3D/2D Switches the display on the LCD monitor Display between 3D and 2D. The image will be recorded in 3D even if the display on the LCD monitor is set to 2D. 8 MENU Displays the various menus of video recording. "Operating the Menu" (A p. 99) 9 Display Button n Some displays disappear after approximately 3 seconds. Use the n button to change the displays as shown below. 0 Tap n button Displays appear for approximately 3 seconds with every tap. 0 Tap and hold n button Displays are fixed such that they do not disappear. After setting, the display button changes from n to m. Tap m to release the displays. 30
-
 1
1 -
2
-
3
-
4
-
5
-
6
-
7
-
8
-
9
-
10
-
11
-
12
-
13
-
14
-
15
-
16
-
17
-
18
-
19
-
20
-
21
-
22
-
23
-
24
-
 25
25 -
 26
26 -
 27
27 -
 28
28 -
 29
29 -
 30
30 -
 31
31 -
 32
32 -
 33
33 -
 34
34 -
 35
35 -
36
-
37
-
38
-
39
-
40
-
41
-
42
-
43
-
44
-
45
-
46
-
47
-
48
-
49
-
50
-
51
-
52
-
53
-
54
-
55
-
56
-
57
-
58
-
59
-
60
-
61
-
62
-
63
-
64
-
65
-
66
-
67
-
68
-
69
-
70
-
71
-
72
-
73
-
74
-
75
-
76
-
77
-
78
-
79
-
80
-
81
-
82
-
83
-
84
-
85
-
86
-
87
-
88
-
89
-
90
-
91
-
92
-
93
-
94
-
95
-
96
-
97
-
98
-
99
-
100
-
101
-
102
-
103
-
104
-
105
-
106
-
107
-
108
-
109
-
110
-
111
-
112
-
113
-
114
-
115
-
116
-
117
-
118
-
119
-
120
-
121
-
122
-
123
-
124
-
125
-
126
-
127
-
128
-
129
-
130
-
131
-
132
-
133
-
134
-
135
-
136
-
137
-
138
-
139
-
140
-
141
-
142
-
143
-
144
-
145
-
146
 |
 |
