JVC GS-TD1BUS Detailed User Guide - Page 58
Searching for a Specific Video/Still Image, Date Search, Connecting to and Viewing on TV
 |
View all JVC GS-TD1BUS manuals
Add to My Manuals
Save this manual to your list of manuals |
Page 58 highlights
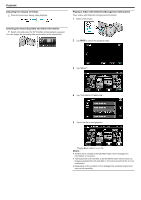
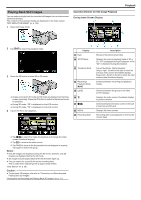
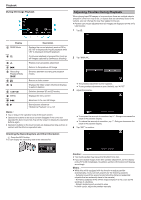
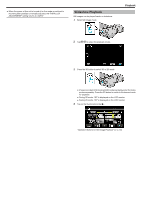
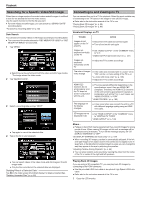
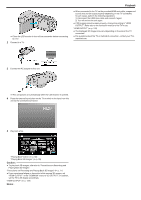
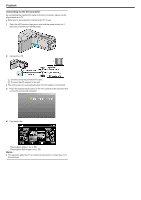
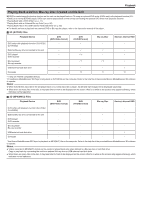
.... Playback Searching for a Specific Video/Still Image When there is a large number of recorded videos and still images, it is difficult to look for the desired file from the index screen. Use the search function to find the file you want. 0 For both videos and still images, you can search by "SEARCH DATE" (recording date). "To search by recording dates" (A p. 58) Date Search You can search and play videos or still images according to recording dates. 0 The contents of the media selected in "REC MEDIA FOR VIDEO" or "REC MEDIA FOR IMAGE" are searched. 1 Tap "MENU". 0 Searching can be performed in both the video and still image modes. *The image shows the video mode. 2 Tap "SEARCH DATE". 3 Select a recording date and tap "NEXT". 0 Tap again to cancel the selected date. 4 Tap on the file to start playback. Connecting to and Viewing on TV You can connect this unit to a TV for playback. Select the most suitable way of connecting to the TV based on the image to view (3D/2D image). 0 Refer also to the instruction manual of the TV in use. "Playing Back 3D Images" (A p. 58) "Playing Back 2D Images" (A p. 60) Unnatural Displays on TV Trouble Action Images do not appear on the TV properly. 0 Disconnect the cable and connect again. 0 Turn off and on this unit again. Images are projected vertically on the TV. 0 Set "VIDEO OUTPUT" in the "COMMON" menu to "4:3". "VIDEO OUTPUT (2D mode only)" (A p. 127) Images are projected horizontally on the TV. 0 Adjust the TV's screen accordingly. The color of images looks strange. 0 If the video was recorded with "x.v.Color" set to "ON", set the x.v.Color setting of the TV to on. "x.v.Color (2D mode only)" (A p. 106) 0 Adjust the TV's screen accordingly. HDMI-CEC functions do not work properly, and the TV does not work in conjunction with this unit. 0 TVs may operate differently depending on the specifications, even if they are HDMI-CEC compliant. Therefore, the HDMI-CEC functions of this unit cannot be guaranteed to operate in combination with all the TVs. In such cases, set "HDMI CONTROL" to "OFF". "HDMI CONTROL" (A p. 129) The language on the display changed. 0 It may occur when you connect this unit to a TV with different language setting using an HDMI mini cable. 3D images are not displayed in 3D. 0 Set "HDMI OUTPUT" in the "COMMON" menu to "CERTAIN TV TYPES". "HDMI OUTPUT" (A p. 128) Memo : 0 Fatigue or discomfort may be experienced if you view 3D images for a long period of time. When viewing 3D images on this unit, a message will be displayed every 30 minutes. To turn off the message display, set "3D DISPLAY WARNING" to "OFF". "3D DISPLAY WARNING (3D mode only)" (A p. 127) 0 When recording 3D images, parallax is automatically adjusted. If the left and right images of an object close to the camera do not appear to be in alignment, or the 3D effect of a distant object is weak, you can change the way they appear to the eye by adjusting the parallax. "Adjusting Parallax During Playback" (A p. 56) 0 You can enjoy realistic audio sounds by viewing the video from the center of the TV or center of the right and left speakers. 0 You can select videos in the video mode and still images in the still image mode. 0 Only the files recorded on the selected date are displayed. Deleting Files of a Selected Date: Tap A on the index screen (thumbnail display) to delete unwanted files. "Deleting Unwanted Files" (A p. 65) Playing Back 3D Images If you are using a 3D compatible TV, you can play back 3D images by connecting to the HDMI connector. 0 Use the provided HDMI mini cable or an optional High Speed HDMI mini cable. 0 Refer also to the instruction manual of the TV in use. 1 Close the LCD monitor. 58
-
 1
1 -
2
-
3
-
4
-
5
-
6
-
7
-
8
-
9
-
10
-
11
-
12
-
13
-
14
-
15
-
16
-
17
-
18
-
19
-
20
-
21
-
22
-
23
-
24
-
25
-
26
-
27
-
28
-
29
-
30
-
31
-
32
-
33
-
34
-
35
-
36
-
37
-
38
-
39
-
40
-
41
-
42
-
43
-
44
-
45
-
46
-
47
-
48
-
49
-
50
-
51
-
52
-
 53
53 -
 54
54 -
 55
55 -
 56
56 -
 57
57 -
 58
58 -
 59
59 -
 60
60 -
 61
61 -
 62
62 -
 63
63 -
64
-
65
-
66
-
67
-
68
-
69
-
70
-
71
-
72
-
73
-
74
-
75
-
76
-
77
-
78
-
79
-
80
-
81
-
82
-
83
-
84
-
85
-
86
-
87
-
88
-
89
-
90
-
91
-
92
-
93
-
94
-
95
-
96
-
97
-
98
-
99
-
100
-
101
-
102
-
103
-
104
-
105
-
106
-
107
-
108
-
109
-
110
-
111
-
112
-
113
-
114
-
115
-
116
-
117
-
118
-
119
-
120
-
121
-
122
-
123
-
124
-
125
-
126
-
127
-
128
-
129
-
130
-
131
-
132
-
133
-
134
-
135
-
136
-
137
-
138
-
139
-
140
-
141
-
142
-
143
-
144
-
145
-
146
 |
 |
