JVC GZ-HM50US Basic User Guide - Page 15
Getting Started, Recording, Copying, Further, Information, Playback
 |
View all JVC GZ-HM50US manuals
Add to My Manuals
Save this manual to your list of manuals |
Page 15 highlights
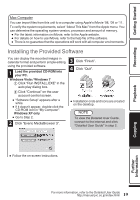
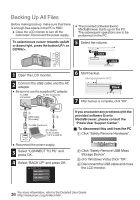
Getting Started Recording Playback o Playing back in standard quality If you are using a conventional TV, you can play back in standard quality by connecting to the AV connector. Connecting to the AV connector TV Yellow Video Input AV Cable (Provided) White Video Input Audio Input (L) To AV Connector Red . Audio Input (R) 2 Connect the AC adapter. 0 This unit powers on automatically when the AC adapter is connected. 3 Select the TV input switch. 4 Play back a file. (p. 13) o To play back with date/time display Set "DISPLAY ON TV" in the "CONNECTION SETTINGS" menu to "ON". Set "ON-SCREEN DISPLAY" in the playback menu to "ON". o When images look unnatural on the TV Images do not appear on the TV 0 Disconnect the cable and connect again. properly. 0 Turn off and on this unit again. Images are projected vertically on 0 Set "VIDEO OUTPUT" in the "CONNECTION the TV. SETTINGS" menu to "4:3". Images are projected horizontally 0 Adjust the TV's screen accordingly. on the TV. The color of images looks strange. 0 When the video was recorded with "x.v.Color" set to "ON", change the setting as desired on TV. 0 Adjust the TV's screen accordingly. Copying Further Information 15 For more information, refer to the Detailed User Guide http://manual.jvc.co.jp/index.html/
-
 1
1 -
2
-
3
-
4
-
5
-
6
-
7
-
8
-
9
-
 10
10 -
 11
11 -
 12
12 -
 13
13 -
 14
14 -
 15
15 -
 16
16 -
 17
17 -
 18
18 -
 19
19 -
 20
20 -
21
-
22
-
23
-
24
-
25
-
26
-
27
-
28
-
29
-
30
-
31
-
32
-
33
-
34
-
35
-
36
-
37
-
38
-
39
-
40
-
41
-
42
-
43
-
44
-
45
-
46
-
47
-
48
-
49
-
50
-
51
-
52
-
53
-
54
-
55
-
56
 |
 |
