JVC HM700U Instruction Manual - Page 29
Setting the Clock (Initial Setting), Screen, Changing the Time after Initial Setting - gy b h
 |
View all JVC HM700U manuals
Add to My Manuals
Save this manual to your list of manuals |
Page 29 highlights
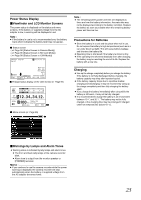
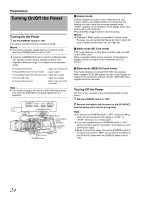
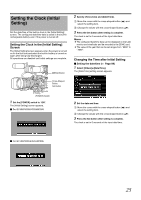
( Setting the Clock (Initial Setting) Set the date/time of the built-in clock in the [Initial Setting] screen. The configured date/time data is saved in the built-in rechargeable battery even if the power is turned off. Setting the Clock in the [Initial Setting] Screen The [Initial Setting] screen appears when the power is turned on for the first time and when the built-in battery is turned on again after being fully discharged. All operations are disabled until initial settings are complete. [MENU] Button Cross-Shaped Button, Set Button 2 Specify [Time Zone] and [Date/Time]. A Move the cursor with the cross-shaped button (HI) and select the setting item. B Change the values with the cross-shaped button (JK). 3 Press the Set button after setting is complete. The clock is set to 0 seconds of the input date/time. Memo : ● The configured date/time data can be displayed on the LCD monitor and viewfinder and be recorded to the SDHC card. ● The value of the year that can be set ranges from A2000B to A2099B. Changing the Time after Initial Setting Ⅵ Setting the date/time (A Page 88) 1 Select [Others]B[Date/Time]. The [Date/Time] setting screen appears. [POWER] Switch 1 Set the [POWER] switch to AONB. The [Initial Setting] screen appears. Ⅵ For GY-HM700CHU/GY-HM700U 2 Set the date and time. A Move the cursor with the cross-shaped button (HI) and select the setting item. B Change the values with the cross-shaped button (JK). 3 Press the Set button after setting is complete. The clock is set to 0 seconds of the input date/time. Ⅵ For GY-HM700CHE/GY-HM700E 25
-
 1
1 -
2
-
3
-
4
-
5
-
6
-
7
-
8
-
9
-
10
-
11
-
12
-
13
-
14
-
15
-
16
-
17
-
18
-
19
-
20
-
21
-
22
-
23
-
 24
24 -
 25
25 -
 26
26 -
 27
27 -
 28
28 -
 29
29 -
 30
30 -
 31
31 -
 32
32 -
 33
33 -
 34
34 -
35
-
36
-
37
-
38
-
39
-
40
-
41
-
42
-
43
-
44
-
45
-
46
-
47
-
48
-
49
-
50
-
51
-
52
-
53
-
54
-
55
-
56
-
57
-
58
-
59
-
60
-
61
-
62
-
63
-
64
-
65
-
66
-
67
-
68
-
69
-
70
-
71
-
72
-
73
-
74
-
75
-
76
-
77
-
78
-
79
-
80
-
81
-
82
-
83
-
84
-
85
-
86
-
87
-
88
-
89
-
90
-
91
-
92
-
93
-
94
-
95
-
96
-
97
-
98
-
99
-
100
-
101
-
102
-
103
-
104
-
105
-
106
-
107
-
108
-
109
-
110
-
111
-
112
-
113
-
114
-
115
-
116
-
117
-
118
-
119
-
120
-
121
-
122
-
123
-
124
-
125
-
126
-
127
-
128
 |
 |
