JVC KD-SR80BT Instruction Manual - Page 19
Display Settings - wiring
 |
View all JVC KD-SR80BT manuals
Add to My Manuals
Save this manual to your list of manuals |
Page 19 highlights
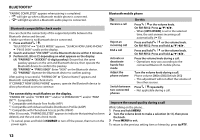
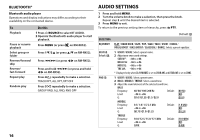
AUDIO SETTINGS DISPLAY SETTINGS AUDIO BASS BOOST +01 / +02: Selects your preferred bass boost level. ; OFF: Cancels. LOUD 01 / 02: Boosts low or high frequencies to produce a well-balanced sound at low volume. ; OFF: Cancels. SUB.W LEVEL*1 -08 - +08 (00): Adjusts the subwoofer output level. SUB.W *2 ON / OFF: Turns on or off the subwoofer output. SUB.W LPF*1 THROUGH: All signals are sent to the subwoofer. ; LOW 55Hz / MID 85Hz / HIGH 120Hz: Audio signals with frequencies lower than 55 Hz/ 85 Hz/ 120 Hz are sent to the subwoofer. FADER*3*4 R06 - F06 (00): Adjusts the front and rear speaker output balance. BALANCE*3 L06 - R06 (00): Adjusts the left and right speaker output balance. VOL ADJUST -05 - +05 (00): Presets the volume adjustment level of each source (compared to the FM volume level). Before adjustment, select the source you want to adjust. ("VOL ADJ FIX" appears if FM is selected.) AMP GAIN LOW POWER: Limits the maximum volume level to 30. (Select if the maximum power of each speaker is less than 50 W to prevent damaging the speakers.) ; HIGH POWER: The maximum volume level is 50. D.T.EXP (Digital Track Expander) ON: Creates realistic sound by compensating the high-frequency components and restoring the rise-time of the waveform that are lost in audio data compression. ; OFF: Cancels. L/O MODE SUB.W / REAR: Selects whether rear speakers or a subwoofer are connected to the REAR/SW line out terminals on the rear panel (through an external amplifier). *1 Displayed only when [L/O MODE] is set to [SUB.W] and [SUB.W] is set to [ON]. *2 Displayed only when [L/O MODE] is set to [SUB.W]. *3 This adjustment will not affect the subwoofer output. *4 If you are using a two-speaker system, set the fader level to [00]. 1 Press and hold MENU. 2 Turn the volume knob to make a selection (see the following table), then press the knob. Repeat step 2 until the desired item is selected. 3 Press MENU to exit. To return to the previous setting item or hierarchy, press G PTY. Default: XX DISPLAY DIMMER Selects the display and button illumination adjusted in the [BRIGHTNESS] setting. AUTO: Changes between the day and night adjustments when you turn off or on the car headlights.*1 ; ON: Selects the night adjustments. ; OFF: Selects the day adjustments. BRIGHTNESS Sets the button, display and USB input terminal brightness for day and night separately. 1 DAY / NIGHT: Select day or night. 2 Select a zone for setting. ( Illustration above) 3 Set the brightness level (00 to 31). (Default: DAY: 31 ; NIGHT: 15) SCROLL *2 ONCE: Scrolls the display information once. ; AUTO: Repeats scrolling at 5-second intervals. ; OFF: Cancels. *1 The illumination control wire connection is required. ( 25) *2 Some characters or symbols will not be shown correctly (or will be blanked). ENGLISH | 17
-
 1
1 -
2
-
3
-
4
-
5
-
6
-
7
-
8
-
9
-
10
-
11
-
12
-
13
-
 14
14 -
 15
15 -
 16
16 -
 17
17 -
 18
18 -
 19
19 -
 20
20 -
 21
21 -
 22
22 -
 23
23 -
 24
24 -
25
-
26
-
27
-
28
-
29
-
30
-
31
-
32
-
33
-
34
-
35
-
36
-
37
-
38
-
39
-
40
-
41
-
42
-
43
-
44
-
45
-
46
-
47
-
48
-
49
-
50
-
51
-
52
-
53
-
54
-
55
-
56
-
57
-
58
-
59
-
60
-
61
-
62
-
63
-
64
-
65
-
66
-
67
-
68
-
69
-
70
-
71
-
72
-
73
-
74
-
75
-
76
 |
 |