JVC KW AVX810 Instructions - Page 59
Display, Clock, SETTINGS, ENGLISH
 |
UPC - 046838031939
View all JVC KW AVX810 manuals
Add to My Manuals
Save this manual to your list of manuals |
Page 59 highlights
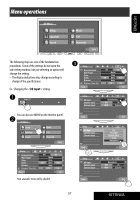
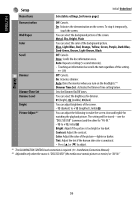
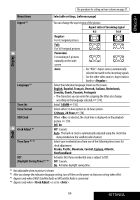
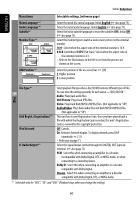
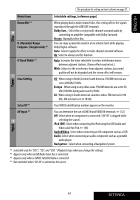
ENGLISH The procedure for setting an item is shown on page 57. Menu items Selectable settings, [reference page] Aspect *3 You can change the aspect ratio of the picture. Aspect ratio of incoming signal 4:3 16:9 Display Language *4 Time Set Time Format OSD Clock Clock Adjust *5 Time Zone *5 *6 DST (Daylight Saving Time) *5 *6 Regular: For 4:3 original pictures Full: For 16:9 original pictures Panorama: For viewing 4:3 pictures naturally on the wide screen Auto: • For "DISC": Aspect ratio is automatically selected to match to the incoming signals. • For the other video sources: Aspect ratio is fixed to . Select the indication language shown on the screen. English, Español, Français, Deutsch, Italiano, Nederlands, Svenska, Dansk, Руccĸий, Português • The characters you can enter for assigning the titles also change according to the language selected, ☞ [74]. Initial 1:00AM ☞ [10] Select either 12-hour system or 24-hour system. 12 Hours, 24 Hours ☞ [10] When is selected, the clock time is displayed on the playback picture. ☞ [10] Off, On Off : Cancels. Auto : The built-in clock is automatically adjusted using the clock time data provided via the satellite radio channel. Select your residential area from one of the following time zones for clock adjustment. Alaska, Pacific, Mountain, Central, Eastern, Atlantic, Newfoundland Activates this if your residential area is subject to DST. Off : Cancels. On : Activates daylight saving time. Clock *3 Not adjustable when no picture is shown. *4 After you change the indication language setting, turn off then on the power so that your setting takes effect. *5 Appears only when SIRIUS Satellite Radio or XM Satellite Radio is connected. *6 Appears only when is set to . 59 SETTINGS
-
 1
1 -
2
-
3
-
4
-
5
-
6
-
7
-
8
-
9
-
10
-
11
-
12
-
13
-
14
-
15
-
16
-
17
-
18
-
19
-
20
-
21
-
22
-
23
-
24
-
25
-
26
-
27
-
28
-
29
-
30
-
31
-
32
-
33
-
34
-
35
-
36
-
37
-
38
-
39
-
40
-
41
-
42
-
43
-
44
-
45
-
46
-
47
-
48
-
49
-
50
-
51
-
52
-
53
-
 54
54 -
 55
55 -
 56
56 -
 57
57 -
 58
58 -
 59
59 -
 60
60 -
 61
61 -
 62
62 -
 63
63 -
 64
64 -
65
-
66
-
67
-
68
-
69
-
70
-
71
-
72
-
73
-
74
-
75
-
76
-
77
-
78
-
79
-
80
-
81
-
82
-
83
-
84
-
85
-
86
-
87
-
88
-
89
-
90
-
91
-
92
-
93
-
94
-
95
-
96
-
97
-
98
-
99
-
100
-
101
-
102
-
103
-
104
-
105
-
106
-
107
-
108
-
109
-
110
-
111
-
112
-
113
-
114
-
115
-
116
-
117
-
118
-
119
-
120
-
121
-
122
-
123
-
124
-
125
-
126
-
127
-
128
-
129
-
130
-
131
-
132
-
133
-
134
-
135
-
136
-
137
-
138
-
139
-
140
-
141
-
142
-
143
-
144
-
145
-
146
-
147
-
148
-
149
-
150
-
151
-
152
-
153
-
154
-
155
-
156
-
157
-
158
-
159
-
160
-
161
-
162
-
163
-
164
-
165
-
166
-
167
-
168
-
169
-
170
-
171
-
172
-
173
-
174
-
175
-
176
-
177
-
178
-
179
-
180
-
181
-
182
-
183
-
184
-
185
-
186
-
187
-
188
-
189
-
190
-
191
-
192
-
193
-
194
-
195
-
196
-
197
-
198
-
199
-
200
-
201
-
202
-
203
-
204
-
205
-
206
-
207
-
208
-
209
-
210
-
211
-
212
-
213
-
214
-
215
-
216
-
217
-
218
-
219
-
220
-
221
-
222
-
223
-
224
-
225
-
226
-
227
-
228
-
229
-
230
-
231
-
232
-
233
-
234
-
235
-
236
-
237
-
238
-
239
-
240
-
241
-
242
-
243
 |
 |
