JVC KY-F560U KA-F5602U, KA-F5603U Studio kit for KY-F560U camera (47 page inst - Page 19
Connecting to Remote Control Unit RM-P210 continued, Switch setting, Operation
 |
UPC - 046838326004
View all JVC KY-F560U manuals
Add to My Manuals
Save this manual to your list of manuals |
Page 19 highlights
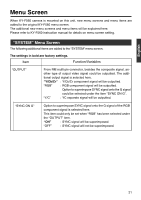
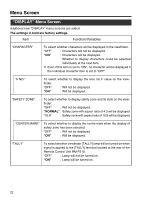
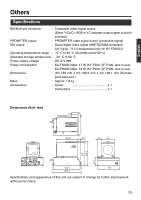
English Connecting to Remote Control Unit RM-P210 (continued) GENLOCK IN VIDEO OUT DC IN SEE INST POWER INTERCOM INCOM MIC VF ON CARBON OFF DYNAMIC INCOM LEVEL CALL MIN MAX Rear view of this unit PUSH [CARBON/DYNAMIC] switch [INCOM MIC ON/OFF] switch Ⅵ Switch setting ● Set the [CARBON/DYNAMIC] switch according to the type of intercom headset microphone to be used. (If JVC Headset KA-310U is connected, choose the [CARBON] setting.)) ● Set the [INCOM MIC ON / OFF] switch depending on whether headset microphone will be used. If the switch is set to [ON], then the headset microphone could be used. Operation ● Turn the [POWER] switch of the camera remote control unit to [ON]. After the [POWER] switch is turned on, camera remote control unit could be operated after about 30 seconds. Note After the power is turned on, the camera remote control unit takes about 30 seconds to be ready to communicate with this unit. GENLOCK IN VIDEO OUT DC IN SEE INST POWER INTERCOM INCOM MIC VF ON CARBON OFF DYNAMIC INCOM LEVEL CALL MIN MAX [CALL] Indicator PUSH [INCOM LEVEL] [CALL] button volume ● When this unit's [CALL] button is pressed and held down, call signals will be sent to the remote control unit operator and the [TALLY] button indicator of the remote control unit will blink. During this duration, the [CALL] indicator of this unit will light up. The Viewfinder's [TALLY] lamp will also blink when call signals are received from the remote control unit. ● The headset reception volume could be adjusted by [INCOM LEVEL] volume. Note ● If both this unit (including the camera) and the remote control unit have the same func- tional switches, the remote control unit switches will be accorded higher priority. ● If local Remote Control Unit (RM-LP55 or RM-LP57) is used simultaneously, the local remote control unit will be accorded higher priority. ● When synchronization signal is added to both the camera and the camera remote con- trol unit, pictures will be distorted. (☞ page 9 'Regarding Gain-lock Signal and adjustment of System Phase') ● If external synchronization signal is present when the power is turned on, pictures may appear jerky for a few seconds. This is not a malfunction. ● When using the remote control unit, refer to its instruction manual for details. 19
-
 1
1 -
2
-
3
-
4
-
5
-
6
-
7
-
8
-
9
-
10
-
11
-
12
-
13
-
 14
14 -
 15
15 -
 16
16 -
 17
17 -
 18
18 -
 19
19 -
 20
20 -
 21
21 -
 22
22 -
 23
23 -
 24
24 -
25
-
26
-
27
-
28
-
29
-
30
-
31
-
32
-
33
-
34
-
35
-
36
-
37
-
38
-
39
-
40
-
41
-
42
-
43
-
44
-
45
-
46
-
47
 |
 |
