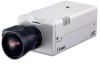
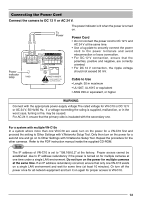
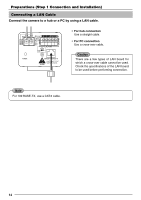
JVC VN-C10U VN-C10U User Manual (32 pages) - Page 18
Select [Internet Protocol TCP/IP] and click [Properties]., in [Local Area Connection Properties].
 |
View all JVC VN-C10U manuals
Add to My Manuals
Save this manual to your list of manuals |
Page 18 highlights
Preparations (Step 2 Setting the Network) Setting the PC's IP Address for Windows XP (continued) 3. Select [Internet Protocol (TCP/IP)] and click [Properties]. Select [Internet Protocol (TCP/IP)]. Click [Properties]. 4. Select [Use the following IP address] to set [IP Address] and [Subnet Mask] and then click . Select [Use the following IP address]. Set [IP Address] to "192.168.0.3." Note ● Before changing the IP address, note down the original address. ● Do not use the same IP address elsewhere in this network environment. Set [Subnet Mask] to an appropriate value according to the operating environment. Ask the network administrator if necessary. Click . 5. Click 18 in [Local Area Connection Properties].
-
 1
1 -
2
-
3
-
4
-
5
-
6
-
7
-
8
-
9
-
10
-
11
-
12
-
 13
13 -
 14
14 -
 15
15 -
 16
16 -
 17
17 -
 18
18 -
 19
19 -
 20
20 -
 21
21 -
 22
22 -
 23
23 -
24
-
25
-
26
-
27
-
28
-
29
-
30
-
31
-
32
 |
 |

18
Setting the PC’s IP Address for Windows XP (continued)
3.
Select [Internet Protocol (TCP/IP)] and click [Properties].
4.
Select [Use the following IP address] to set [IP Address] and [Subnet Mask] and then click
.
Select [Internet Protocol (TCP/IP)].
5.
Click
in [Local Area Connection Properties].
Click [Properties].
Click
.
Select [Use the following IP address].
Set [IP Address] to “192.168.0.3.”
Note
●
Before changing the IP address,
note down the original address.
●
Do not use the same IP address
elsewhere in this network environ-
ment.
Set [Subnet Mask] to an appropriate value
according to the operating environment.
Ask the network administrator if necessary.
Preparations (Step 2 Setting the Network)