JVC VN-C10U VN-C10U User Manual (32 pages) - Page 25
Operations, Step 4 Setting with V.Networks Controller
 |
View all JVC VN-C10U manuals
Add to My Manuals
Save this manual to your list of manuals |
Page 25 highlights
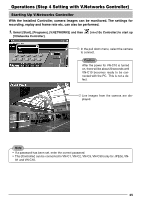
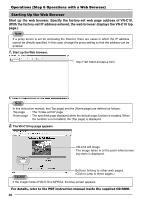
Operations (Step 4 Setting with V.Networks Controller) Starting Up V.Networks Controller With the installed Controller, camera images can be monitored. The settings for recording, replay and frame rate etc. can also be performed. 1. Select [Start], [Programs], [V.NETWORKS] and then [V.Networks Controller]. [vn-c10u Controller] to start up In the pull down menu, select the camera to connect. Caution After the power for VN-C10 is turned on, there will be about 20 seconds until VN-C10 becomes ready to be connected with the PC. This is not a defect. Live images from the camera are displayed. Note • If a password has been set, enter the correct password. • This [Controller] can be connected to VN-C1, VN-C2, VN-C3, VN-C30 (only for JPEG), VN- A1 and VN-C10. 25
-
 1
1 -
2
-
3
-
4
-
5
-
6
-
7
-
8
-
9
-
10
-
11
-
12
-
13
-
14
-
15
-
16
-
17
-
18
-
19
-
 20
20 -
 21
21 -
 22
22 -
 23
23 -
 24
24 -
 25
25 -
 26
26 -
 27
27 -
 28
28 -
 29
29 -
 30
30 -
31
-
32
 |
 |
