JVC VN-C2WU VN-C2WU Vnetworks Camera Instruction Manual (2073KB) - Page 6
VN-C2WU Installation and Setup
 |
View all JVC VN-C2WU manuals
Add to My Manuals
Save this manual to your list of manuals |
Page 6 highlights
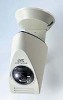
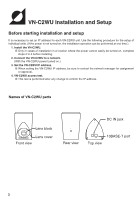
VN-C2WU Installation and Setup Before starting installation and setup It is necessary to set an IP address for each VN-C2WU unit. Use the following procedure for the setup of individual units. (If the power is not turned on, the installation operation can be performed at one time.) 1. Install the VN-C2WU. Only in cases of installation in a location where the power cannot easily be turned on, complete steps 2 to 4 before installing. 2. Connect the VN-C2WU to a network. (With the VN-C2WU power turned on.) 3. Set the VN-C2WU IP address. When setting the VN-C2WU IP address, be sure to contact the network manager for assignment or approval. 4. VN-C2WU access test. This test is performed after any change to confirm the IP address. Names of VN-C2WU parts Lens block Lens cover Front view DC IN jack Rear view 10BASE-T port Top view 3
-
 1
1 -
 2
2 -
 3
3 -
 4
4 -
 5
5 -
 6
6 -
 7
7 -
 8
8 -
 9
9 -
 10
10 -
 11
11 -
 12
12 -
13
-
14
-
15
-
16
-
17
-
18
-
19
-
20
-
21
-
22
-
23
-
24
-
25
-
26
-
27
-
28
-
29
-
30
-
31
-
32
-
33
 |
 |
