JVC VN-C2WU VN-C2WU Vnetworks Camera Instruction Manual (2073KB) - Page 8
Connecting to a network, Ethernet, Fast Ethernet through Auto negotiation HUB.
 |
View all JVC VN-C2WU manuals
Add to My Manuals
Save this manual to your list of manuals |
Page 8 highlights
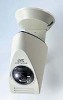
2. Connecting to a network (Ethernet, Fast Ethernet through Auto negotiation HUB). Turn on the power of only one VN-C2WU unit. When network connection is completed and the power is turned on, the VN-C2WU unit will be connected to the network at the following IP address. Factory set (Default) IP address : 192.168. 0. 2 To power outlet Round 3x Optional adapter Ferrite core Install the ferrite core within 50mm of VN-C2WU-side connector. Optional shielded LAN cable (10BASE-T) When connecting to a HUB, use a straight cable. When connecting directly to a PC, use a cross cable. Caution All VN-C2WU units are set to the same IP address at the factory; therefore, if the power of multiple VN-C2WU units is turned on at the same time, correct access will not be possible. Always turn the power on for only one unit at a time. If duplication occured, perform the proper processing, wait for 10 min. or more or turn off the power of all units on the network and then turn the power on again; otherwise, correct access will not be possible. 5
-
 1
1 -
2
-
 3
3 -
 4
4 -
 5
5 -
 6
6 -
 7
7 -
 8
8 -
 9
9 -
 10
10 -
 11
11 -
 12
12 -
 13
13 -
14
-
15
-
16
-
17
-
18
-
19
-
20
-
21
-
22
-
23
-
24
-
25
-
26
-
27
-
28
-
29
-
30
-
31
-
32
-
33
 |
 |
