Jabra T5330 User Manual - Page 4
Overview, Fitting the headset - replacement ear hook
 |
UPC - 706487002284
View all Jabra T5330 manuals
Add to My Manuals
Save this manual to your list of manuals |
Page 4 highlights
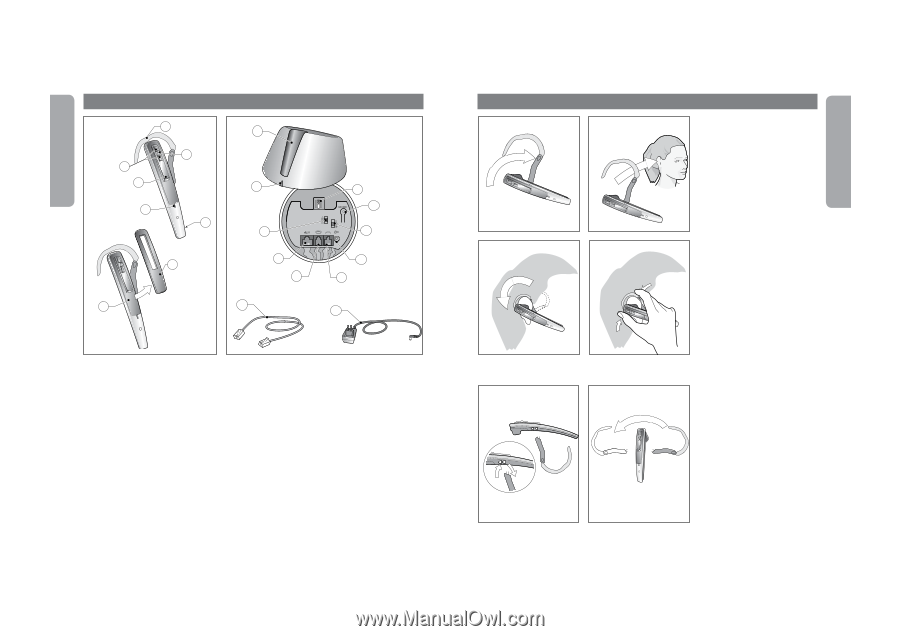
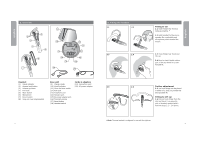
English English 1. Overview 4 5 3 2 1 6 8 7 9 10 11 12 13 19 18 17 16 15 14 20 Headset [1] Visual indicator [2] Answer/end button [3] Volume up/down [4] Ear hook [5] Mute button [6] Microphone [7] Reset button [8] Snap-on cover (replaceable) Base unit [9] Charge cradle [10] Visual indicator [11] Clear dial tone switch [12] AUX port [13] Telephone port [14] Handset port [15] AC power adapter port [16] Transmit volume [17] Reset button [18] Headset switch Cords & adapters [19] Connection cord [20] AC power adapter 2. Fitting the headset 2.1 2.2 2.3 2.4 2.5 2.6 Fitting to ear 2.1 Open hinged ear hook as wide as possible. 1) 2.2 Hold headset to the ear so speaker fits comfortably and microphone points toward the mouth. 2.3 Close hinged ear hook over the ear. 2.4 Bend or twist flexible rubber part of the ear hook for a comfortable fit. Further adjustment 2.5 Ear hook hinge can be placed in either of 2 slots, to provide the best possible fit. Fitting to left ear 2.6 Pull ear hook hinge from the slot and insert it on opposite side of headset marked with L. Perform steps 2.1 - 2.4 above. 1) Note: The new headset is configured for use with the right ear. 2 3
-
 1
1 -
 2
2 -
 3
3 -
 4
4 -
 5
5 -
 6
6 -
 7
7 -
 8
8 -
 9
9 -
 10
10 -
11
-
12
-
13
-
14
-
15
-
16
-
17
-
18
-
19
-
20
-
21
-
22
-
23
-
24
-
25
-
26
-
27
-
28
-
29
-
30
-
31
-
32
-
33
-
34
-
35
-
36
-
37
-
38
-
39
-
40
-
41
-
42
 |
 |