Jenn-Air JGRP436HL Installation Instructions - Page 25
Replace Oven Bake Burner Cover
 |
View all Jenn-Air JGRP436HL manuals
Add to My Manuals
Save this manual to your list of manuals |
Page 25 highlights
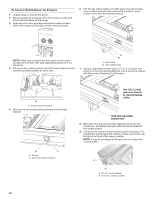
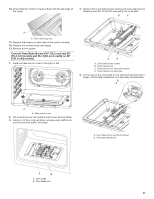
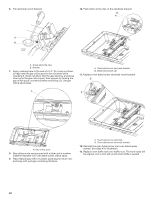
8. Apply masking tape to the end of a 1/4" (6.4 mm) nut driver to help hold the gas orifice spud in the nut driver while changing it. Insert nut driver into the gas opening, and press down onto the gas orifice spud, then remove by turning the gas orifice spud counterclockwise and lifting out. Set gas orifice spud aside. A 12. Replace oven bake burner electrode inside bracket. B A A. Gas orifice spud 9. Gas orifice studs are stamped with a letter and a number. Install the Number 105 oven bake burner orifice spud. 10. Place Natural gas orifice in plastic parts bag for future use, and keep with package containing literature. 11. Push down on the clip on the electrode bracket. B A A. Oven bake burner electrode B. Oven bake burner electrode bracket 13. Reinstall the oven bake burner and oven bake burner screws. See Step 5 for illustration. Replace Oven Bake Burner Cover 1. Align rear shoulder screw mounting holes (keyholes) on the oven bake burner cover with shoulder screws in the bottom of the oven. A. Oven bake burner electrode bracket B. Electrode bracket clip A B A. Shoulder screw mounting holes (keyholes) B. Shoulder screws 2. Drop cover and slide to left or right to slide shoulder screws into narrow ends of keyholes, and lock into place. A A. Bake burner cover 25
-
 1
1 -
2
-
3
-
4
-
5
-
6
-
7
-
8
-
9
-
10
-
11
-
12
-
13
-
14
-
15
-
16
-
17
-
18
-
19
-
 20
20 -
 21
21 -
 22
22 -
 23
23 -
 24
24 -
 25
25 -
 26
26 -
 27
27 -
 28
28 -
 29
29 -
 30
30 -
31
-
32
-
33
-
34
-
35
-
36
-
37
-
38
-
39
-
40
-
41
-
42
-
43
-
44
-
45
-
46
-
47
-
48
-
49
-
50
-
51
-
52
-
53
-
54
-
55
-
56
-
57
-
58
-
59
-
60
-
61
-
62
-
63
-
64
-
65
-
66
-
67
-
68
-
69
-
70
-
71
-
72
 |
 |
